WHY do T-Bar rows?
If your lats looks the same year after year despite stacking plates on the T-Bar machine, it’s not because you need more weight. It’s because those heavy rows aren’t hitting the muscles you think they are.
How can you tell if you fall into this category?
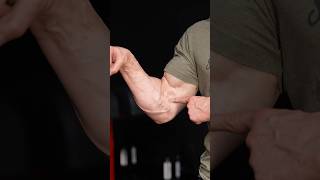
Easy. You’ll notice your shoulder blades shrug, your torso lifts, and your grip handle choice turns this pulling exercise into a Biceps Curl.
In other words, the lower lats, teres major, and rear delts stop doing the work. Momentum takes over, and all that bar weight does more for your Instagram than it does for muscle contraction.
Thankfully, the fix is simple.
In this article, I’m going to break down the muscles worked, show you how to perform T-Bar Rows with intention, highlight the mistakes that stall progress, give you alternatives, and show you how to program and progress the movement for optimal back development.
T-BAR ROWS: MUSCLES WORKED
Understanding the anatomy behind the movement and how to connect your mind to each muscle instantly changes the way you row.
Every grip, angle, and torso position shifts the muscles worked, whether you’re using a T-bar machine, a barbell landmine with a V handle, or single-arm variations like Meadows Rows.
When you know exactly what each muscle should feel like, you stop moving bar weight and start creating intentional, targeted muscle contraction where it counts.
Here are the muscles that you should feel working when you perform a T-Bar Row:
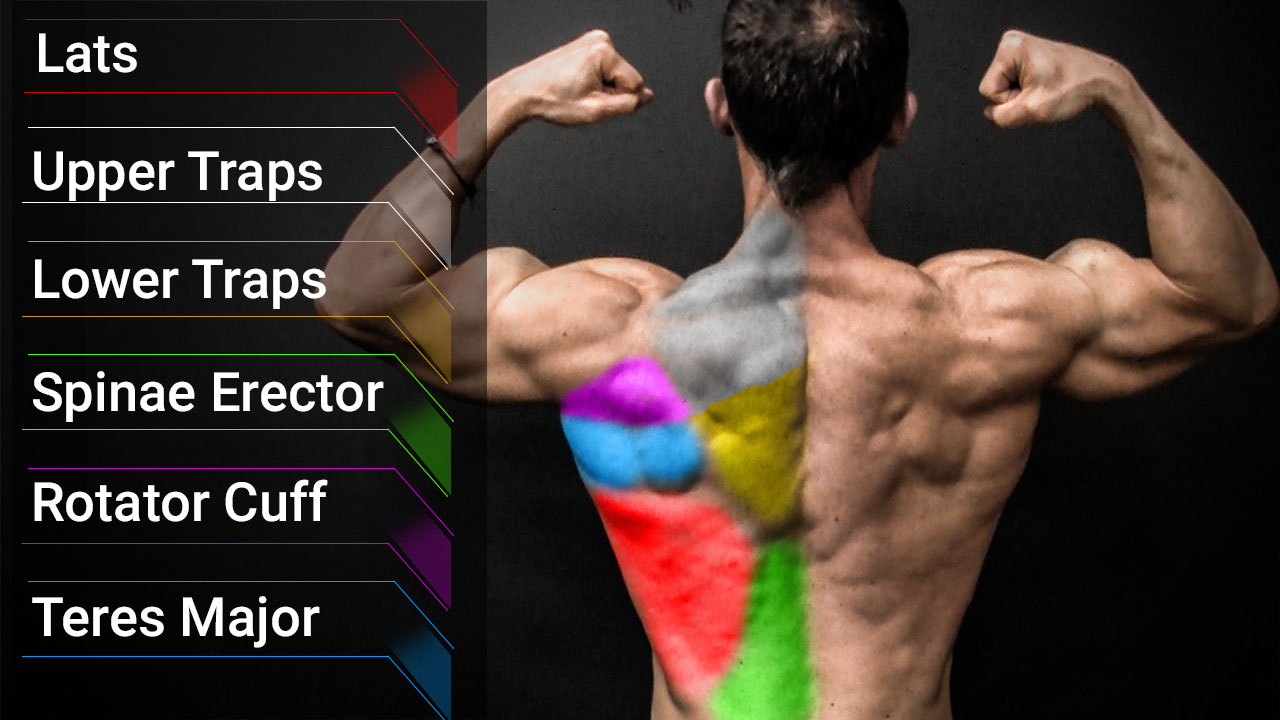
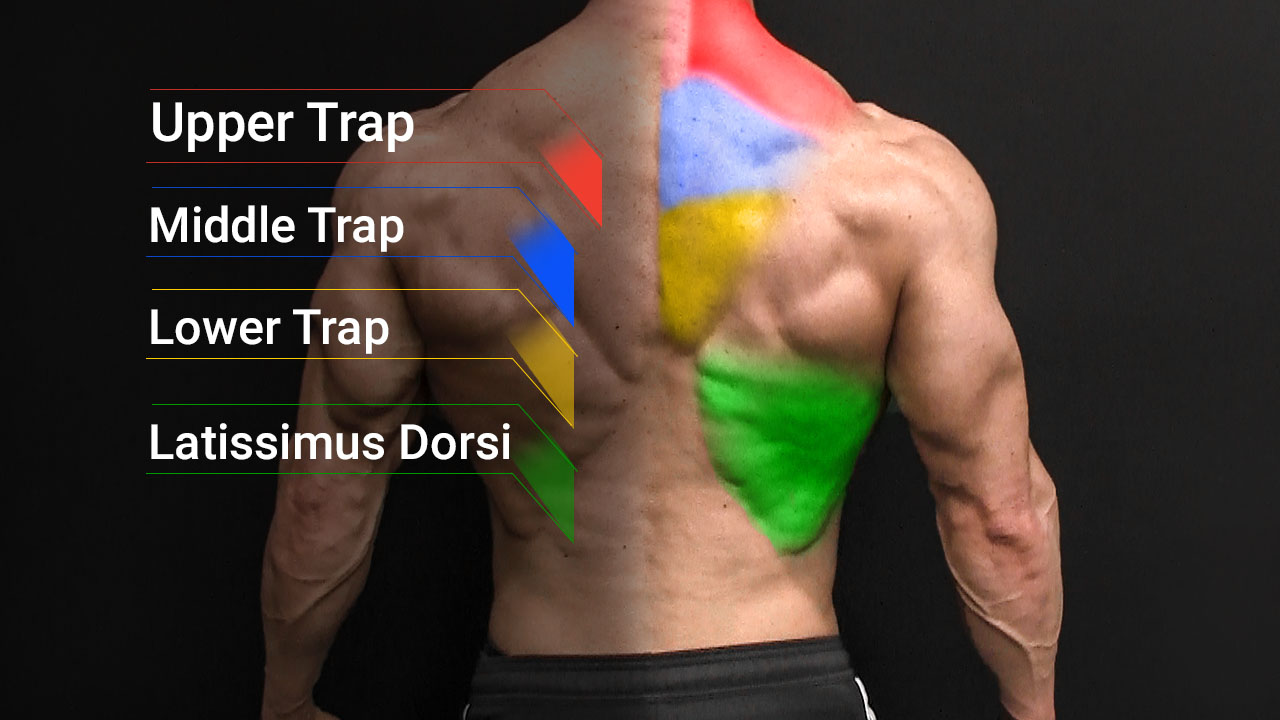
LATISSIMUS DORSI
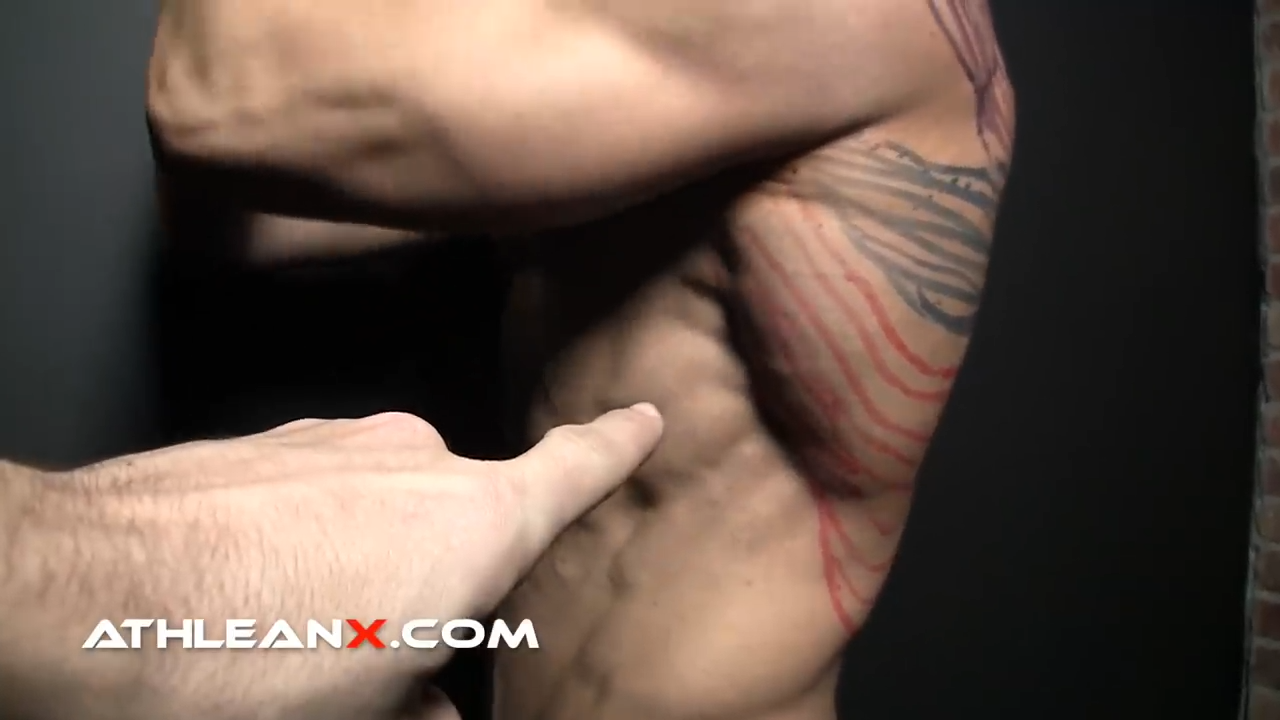
The latissimus dorsi is the large, wing-like muscle that sweeps from the upper arm down across the mid and lower back.
It’s responsible for arm adduction, shoulder extension, and the back width that creates that V-taper effect.
In any T-Bar Row or Barbell Row variation, the lats do their best work when the elbows stay close to the ribs, and the grip stays shoulder-width or slightly wider.
A tighter elbow path pulls more tension into the lower lats and teres major, especially when you row toward the hips instead of the chest.
This is exactly why lifters use Supinated Barbell Rows, Yates Rows, and other close-grip variations. They bias the lat fibers that build vertical thickness.
When you get the setup right, you feel the lats stretch and contract on every rep, and that’s something that no amount of extra plates can replace.
TRapezius 
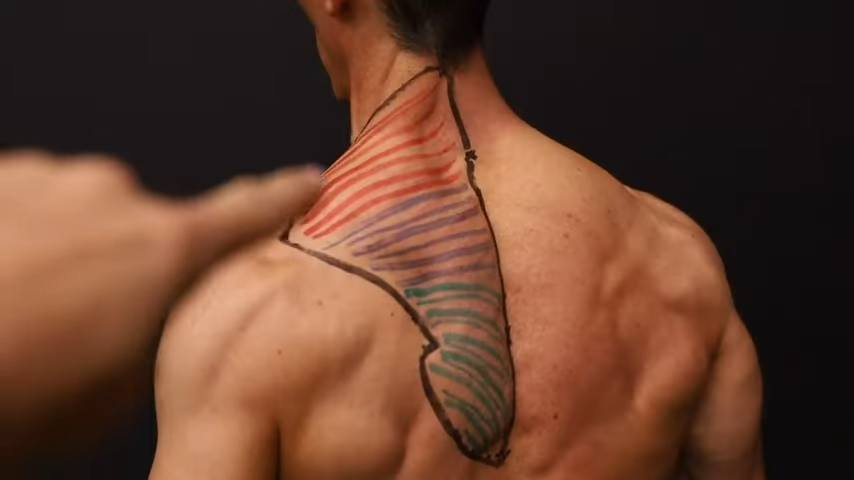
The middle traps span across the mid-back and help retract the scapula, while the lower traps angle downward toward the spine and stabilize the shoulder blades.
Together, they prevent the shoulders from elevating or rolling forward under load.
During T-Bar Rows, these fibers keep the row clean by resisting the urge to shrug as bar weight climbs.
When the traps lose control, the elbows flare, the shoulders lift, and the movement turns into a hybrid Shrug-Row.
Proper trap function keeps the shoulder blades locked down and back, allowing the lats and rhomboids to pull the weight instead of the upper traps doing damage control.
RHOMBOIDS
The rhomboids lie underneath the traps, connecting the spine to the shoulder blades. Their main job is scapular retraction or pulling the shoulder blades back and together.
During a T-Bar Row, these muscles only get fully engaged when the movement starts at the scapula, not the elbows.
If you pull the bar by curling it with the biceps brachii, the rhomboids barely fire.
But when you consciously pull your shoulder blades back first, the mid-back tightens, the chest stays up, and your posture stabilizes instantly.
This difference in activation is what separates a textbook T Bar Row from a sloppy Bent-Over Barbell Row done with momentum.
ERECTOR SPINAE
The erector spinae run vertically along both sides of the spine, supporting the low back and maintaining a neutral, stable torso.
Their role in T-bar rows isn’t to move weight. It’s to prevent you from folding under it.
When you perform the T-Bar Row, Pendlay Row, or Dumbbell Seal Row, the erectors contract isometrically to keep the spine from rounding.
A proper hip hinge puts them in a strong position while a rounded or hyper-extended low back puts them in danger.
If you feel more erector fatigue than lat contraction, you’re either too upright, too rounded, or letting momentum dictate the movement.
REAR DELTS (POSTERIOR DELTOIDS)
The rear deltoids sit on the back of the shoulder and assist in horizontal abduction and external rotation.
In T-Bar Rows, their job is to help the upper back pull the arm behind the body, especially in wider-grip or chest-supported variations.
A healthy amount of rear delt activation is expected, but they shouldn’t dominate the entire movement.
If you feel more rear delt burn than lat or rhomboid tension, your elbows are likely flaring too far out, or the row is drifting into a pattern closer to Renegade Rows or Cable Machine Flys.
Proper elbow alignment allows the rear delts to contribute without stealing the entire show.
BICEPS & BRACHIALIS
The biceps brachii and brachialis control elbow flexion, making them supportive muscles, not the primary engines of the row. Their job is to finish the pull once the back has already initiated it.
If your biceps dominate every rep, one of four things is probably happening:
- You’re pulling with your arms instead of your shoulder blades,
- The load is too heavy for your mechanics,
- Your grip is too narrow,
- Or your scapular control is nonexistent.
Proper rowing exercises always start with the back. The scapula retracts, the torso stays stable, and the arms follow.
When the sequence is correct, the biceps assist without overpowering the muscles that actually build back thickness and width.
HOW TO DO T-BAR ROWS
Most people look at the T-Bar Row and see a simple pulling exercise, but the truth is, the difference between moving weight and building your back comes down to sequencing, posture, and tension control.
If your shoulder blades don’t initiate the pull, your torso isn’t locked into position, or your elbows aren’t traveling on the right path, the lats and mid-back never get the stimulus you think they’re getting.
Dial in these elements, and the T-Bar Row becomes one of the most efficient back-builders in your entire program. Ignore them, and it turns into nothing more than a heavy arm exercise with a bad hinge.
Here’s how to do T-Bar Rows with perfect form and execution for each and every rep:
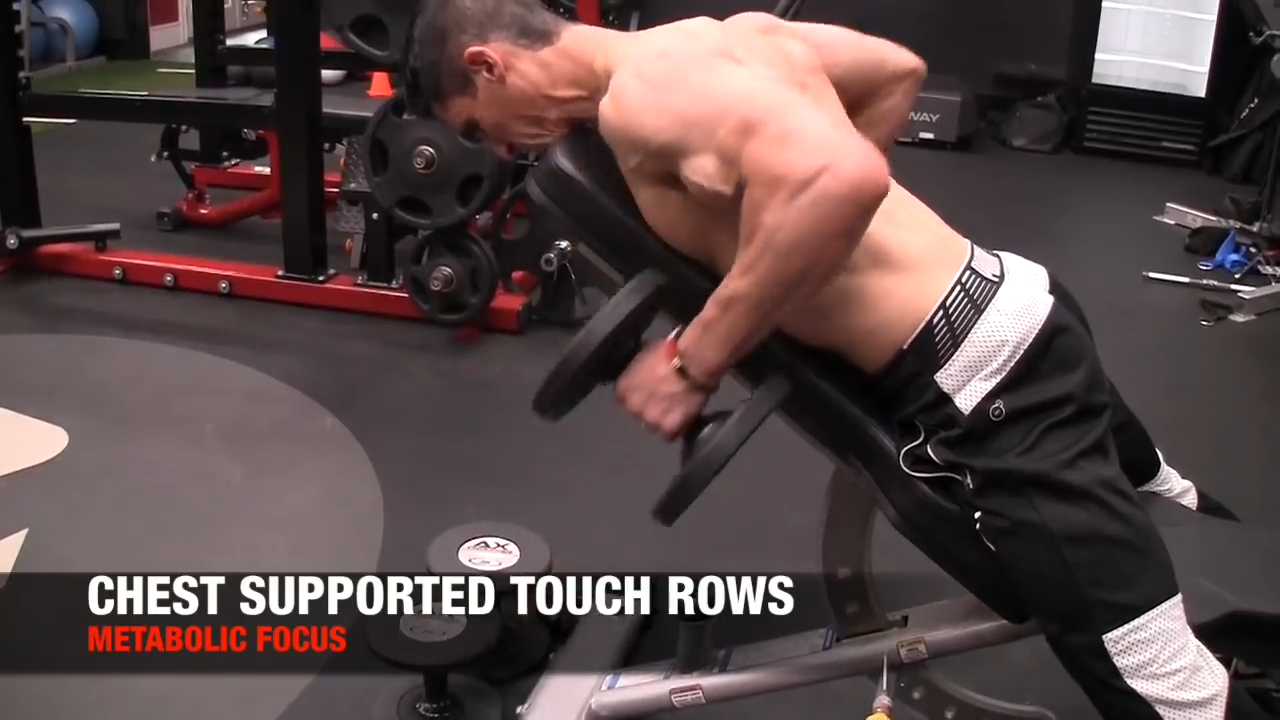
BARBELL T-BAR ROWS (CHEST-SUPPORTED ROWS)

HOW TO DO BARBELL T-BAR ROWS:
- Set an incline bench to roughly a 30 to 45° angle. This should be high enough to let your arms hang freely, low enough to keep your chest planted.
- Place a barbell at the base of the bench so it sits directly beneath your shoulders when you lie face down.
- Once you’re on the bench, drive your chest into the pad, brace your core, and let your arms hang straight toward the floor with a shoulder-width to slightly wider grip.
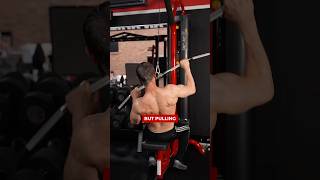
- Before you even think about pulling, lock in your shoulder blades: down and back first. That sets the upper back and takes the biceps out of the driver’s seat.
- From there, row the bar toward the lower ribs, keeping your elbows tight and your chest glued to the pad. No heaving, no lifting your torso off the bench. Just focus on a clean pull driven by the mid-back.
- Pause briefly at the top to own the contraction, then lower the bar under control until your arms are fully extended again.
- Exhale on the pull, inhale on the descent, and keep the movement smooth from start to finish.
WHAT MAKES IT EFFECTIVE: The Barbell T-Bar Row or Chest-Supported Row forces your upper back to do the work by eliminating momentum and taking the low back out of the equation. With the torso locked in place, every rep becomes a pure upper-back pull, which is exactly what most lifters never get from Traditional Rows. The controlled path, fixed angle, and lack of cheating make it one of the most reliable ways to build real strength and thickness across the mid-back.
DUMBBELL T-BAR ROWS (CHEST-SUPPORTED ROWS)
HOW TO DO DUMBBELL T-BAR ROWS:
- Set an incline bench to about 30 to 45 degrees and lie face-down with your chest glued to the pad and your feet anchored on the floor.
- From this position, let a pair of heavy dumbbells hang straight down beneath your shoulders.
- Before you pull, lock your body in place. Brace your core, drive your chest into the bench, and set your shoulder blades down and back.
- From there, row the dumbbells up and in toward the lower ribs, keeping your elbows tight and your wrists neutral.
- Lower under control until your arms are fully extended and you feel a stretch through the lats and mid-back, then repeat.
WHAT MAKES IT EFFECTIVE: This variation eliminates momentum entirely, forcing the lats, rhomboids, and mid-back to drive every rep. Because the bench supports your torso, the lower back stays out of the fight, letting you train the back hard without collapsing your posture. The fixed body position also sharpens the mind-to-muscle connection, making it nearly impossible to “arm pull” your way through the set.
LANDMINE UNDERHAND T-BAR ROWS
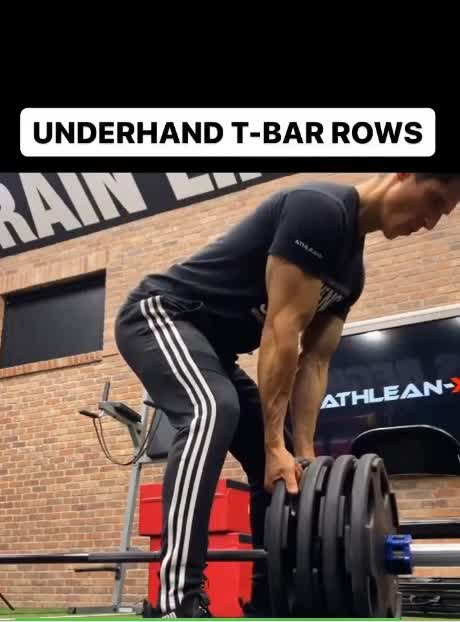
HOW TO DO LANDMINE UNDERHAND T-BAR ROWS:
- Set up a barbell in a landmine attachment and slide on the weight you can control, not just lift.
- Stand straddling the bar, hinge at the hips, and grab the weight plate with an underhand (supinated) grip.
- Your torso should be angled forward at about 45 degrees with your chest up, spine neutral, and shoulder blades set down and back.
- Before you pull, tighten your core and lock in your hinge so nothing moves except your arms and shoulder blades.
- From this position, row the bar toward your lower ribs by driving your elbows back and in. The underhand grip changes the mechanics. It pulls your elbows closer to your sides and shifts more emphasis to the lower lats while still hitting the mid-back hard.
- Pause at the top to own the squeeze then lower the bar under control until your arms are fully extended and your lats are stretched.
WHAT MAKES IT EFFECTIVE: The underhand position naturally tucks the elbows, making it easier to feel the lats engage and harder to cheat by flaring out. The landmine path also keeps the row more stable than a free barbell, allowing you to load the back without wrecking your lower spine. It’s a clean, powerful way to train the lats, rhomboids, and mid-back with a tighter, more controlled pull.
T-BAR ROWS: COMMON MISTAKES
Most T-Bar Row breakdowns come from losing the positions that allow your lats, rhomboids, and mid-back to generate force.
These aren’t strength problems. They’re mechanical problems.
Once the angles shift or the sequence falls apart, the movement stops being a row and becomes a mix of shrugging, curling, and hinging.
Here are the mistakes that sabotage the exercise, why they matter, and how to fix them.
USING MOMENTUM AND HIP THRUSTING
This is the most common mistake and the fastest way to remove the back from the equation.
When you lead with the hips, thrusting them forward or rocking the torso backward, you shortcut the eccentric and completely bypass the lats. Instead of loading the back, you turn the exercise into a Hybrid Deadlift.
Momentum also masks weaknesses because when lifters ego-load the bar, the hips become the engine, and the back becomes a passenger.
The lats never lengthen under control, the rhomboids never retract fully, and the mid-back skips the part of the rep that actually produces growth.
If you can’t hold the top of the rep for a one-second pause without your torso shifting, the weight is too heavy. Lower it until you can control the full range.
ROUNDING THE UPPER BACK
When the thoracic spine rounds, the shoulder blades are forced into a protracted position. That means the rhomboids and mid-traps cannot retract, which removes one of the key drivers of the row.
Instead of pulling with the back, you end up trying to row with the arms while the spine collapses forward.
A rounded upper back also compresses the chest, making it harder to stabilize your hinge and easier to drift toward a shrug-like pattern.
It’s the same breakdown that ruins Bent Over Rows and Pendlay Rows. It turns a strength movement into a compensatory grind.
Lead every rep with scapular retraction. If the chest drops or the spine flexes, reset before continuing.
SHRUGGING DURING THE PULL
Shrugging happens when the upper traps take over the movement, often because the lifter never sets the shoulder blades down before pulling.
When the traps elevate, the lats lose their mechanical advantage. This shortens the pulling path and turns the exercise into a loaded shrug disguised as a row.
Shrugging also disrupts the natural scapular rhythm.
Instead of the shoulder blade gliding back and down, it shoots upward. You lose the lock-in of the mid-back, the elbows flare wide, and the rep becomes a tug-of-war between your traps and your ego.
Imagine putting your shoulder blades in your back pockets before you start. If your shoulders rise even an inch during the pull, you’ve lost the rep.
LETTING THE ELBOWS FLARE EXCESSIVELY
When the elbows flare, the line of pull shifts away from the lats and into the rear delts and upper-back musculature.
This is fine if that’s your goal, but in a T-Bar Row, it’s not.
Excess elbow flare also shortens the stroke, making it easier to cheat through the mid-range and harder to achieve a full contraction.
Flaring often happens subconsciously as the weight climbs. As fatigue sets in, the body chooses the easiest path, which is to widen the elbows, shorten the range, and turn the row into a rear delt / upper trap hybrid movement.
Keep the elbows 15 to 30 degrees from the torso. If they drift outward as the set progresses, reduce the weight and focus on the lat-driven path.
PULLING WITH THE ARMS FIRST
When the arms initiate the movement, the back has no chance to engage. The scapula never retracts, the chest never sets, and the lats are forced to work from an unstable base.
What you’re left with is a heavy curl in a hinged position, and that’s dangerous, inefficient, and completely misaligned with the purpose of the exercise.
This error shows up often after wrist injuries or elbow discomfort because lifters subconsciously change the movement to protect the joint.
Unfortunately, that compensation shifts all the load away from the back.
Start every rep with a micro-retraction of the shoulder blades then pull. If you feel your biceps before your mid-back, the sequencing is wrong.
STANDING TOO UPRIGHT
As the torso becomes more vertical, the row loses its horizontal pulling mechanics. A vertical torso places the traps directly under the load and robs the lats of both stretch and leverage.
The movement shifts from a row to a partial shrug, and the rhomboids never reach a meaningful retraction.
Being upright also limits the involvement of the erectors and core, which should be stabilizing the hinge. Without that tension, the movement becomes sloppy, inconsistent, and easier to cheat.
Maintain a 30 to 45-degree hinge. Chest up, hips back, spine long. If the torso creeps upward mid-set, reduce the load and reset your hinge.
LOADING TOO MANY PLATES
The fastest way to ruin a T-Bar Row is to treat it like a test of how many plates you can wedge under the handle.
Once the bar is overloaded, the range of motion shortens into inch-long “reps.”
You can’t retract, you can’t depress the shoulder blades, and you can’t let the lats stretch, which means you’re not training the back at all.
Overloading also forces compensations across the board: rounded spine, hip thrusts, elbow flaring, and spinal rotation. In other words, everything except what a T-Bar Row is supposed to train.
Earn the plates. Don’t stack them. If you can’t touch the bottom stretch and hold the top contraction, the bar is too heavy.
T-BAR ROWS: VARIATIONS
One of the biggest advantages of the T-Bar Row is how adaptable it is.
A small change in grip, angle, or setup can shift the tension to a different part of your back or help you train around fatigue, equipment limitations, or old injuries.
These variations aren’t just random options. They’re tools that let you match the exercise to your structure, your goals, and the demands of your program.
Here are some T-Bar Row variations that you can include in your workout routine:
meadows row
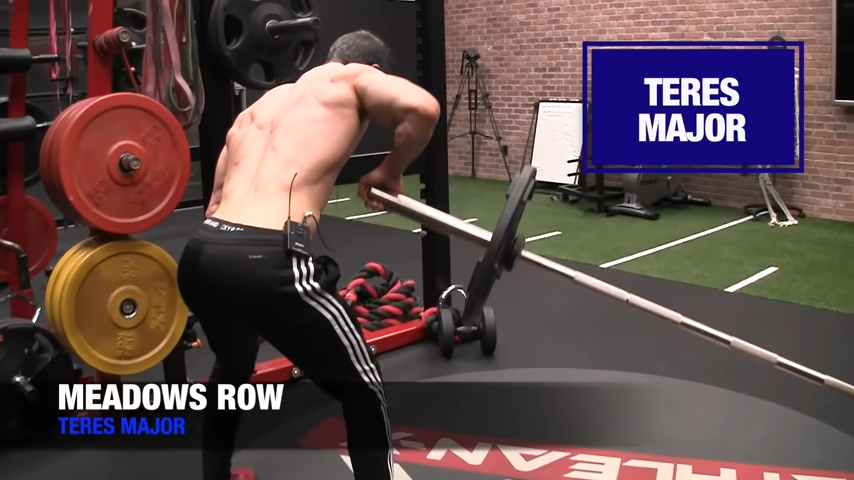
HOW TO DO THE MEADOWS ROW:
- Set up a barbell in a landmine attachment and load the sleeve with a manageable weight.
- Stand perpendicular to the bar so the plates are on your outside shoulder.
- Step your inside foot forward, outside foot back, and hinge at the hips so your torso is angled over the bar while staying square to the floor.
- Reach down with your outside hand and grab the end of the bar just below the plates.
- Before you pull, lock your hips in place, brace your core, and set your shoulder blade down and back.
- From this position, row the bar up along your side, driving the elbow toward your hip. The landmine angle puts the arm slightly out to the side, which gives you a deep stretch at the bottom and heavy engagement of the lower lats, mid-back, and rear delts as you pull.
- Pause briefly at the top, keeping your torso still and your hips squared, then lower the bar under control until you feel the full stretch again.
WHAT MAKES IT EFFECTIVE: Gripping the bar at the sleeve forces a longer range of motion and a deeper stretch than most rowing variations, especially at the bottom where the lats are strongest. The offset stance and perpendicular setup also eliminate the ability to cheat with momentum or rotation.
BENT-OVER ROWS
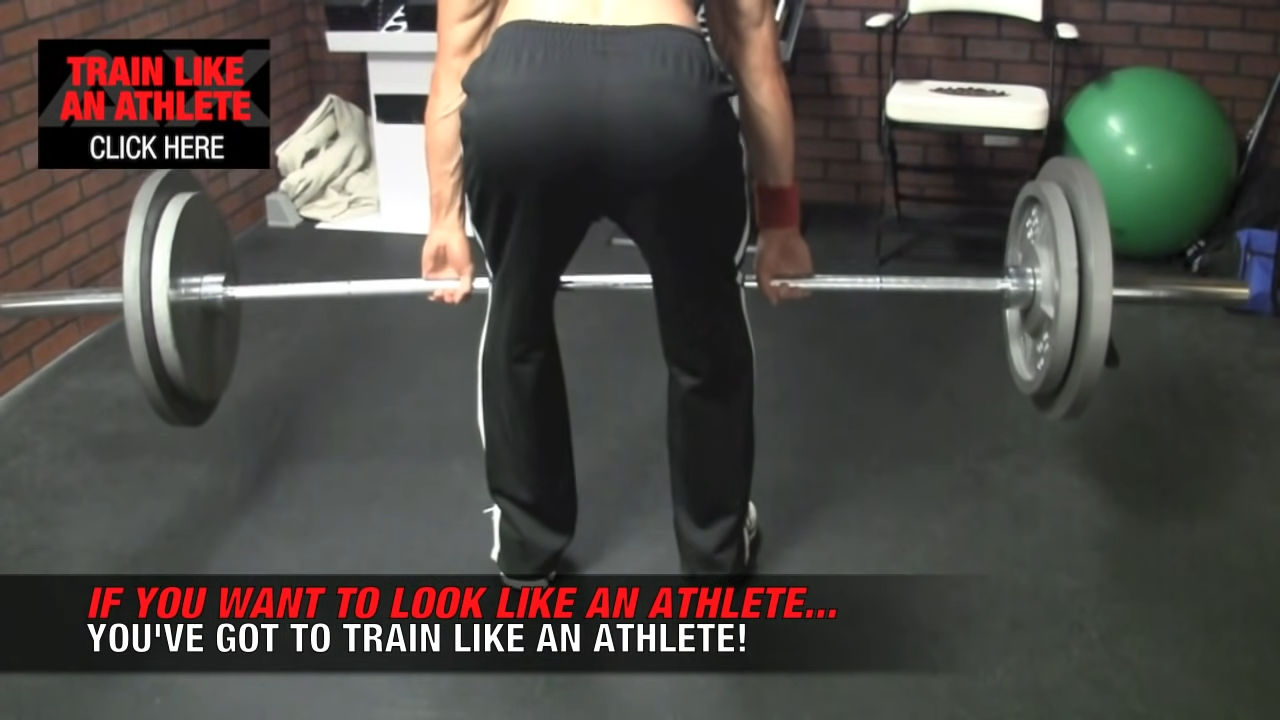
HOW TO DO THE BENT OVER ROW:
- Stand with your feet roughly hip-width apart and grab the bar just outside shoulder width.
- Before you lift it, set your spine: push your hips back, hinge until your torso is around 30 to 45 degrees from the floor, and lock in a neutral lower back.
- Your chest should be angled forward, not dropped, and your shoulder blades should be pulled slightly down and back to create a stable base.
- Once you’re in position, brace your core and let the bar hang directly under your shoulders with your arms fully extended.
- Initiate the pull by retracting your shoulder blades, then drive your elbows back along your sides to bring the bar toward your lower ribs or upper abdomen.
- Keep your torso still; no rising, rocking, or shifting your hips to chase the weight.
- At the top, pause briefly to own the contraction, then lower the bar under control until your arms are straight and the lats are fully stretched before starting the next rep.
WHAT MAKES IT EFFECTIVE: The Bent-Over Barbell Row trains multiple layers of the back in one coordinated pull. The hinge position forces the lats, rhomboids, and mid-traps to work against both gravity and the bar’s forward pull, creating a blend of horizontal and diagonal tension that few rowing exercises replicate. Your erectors and core must stabilize the entire torso, which builds real-world strength and carryover to other heavy pulling pattern movements.
LANDMINE ONE-ARM ROWS
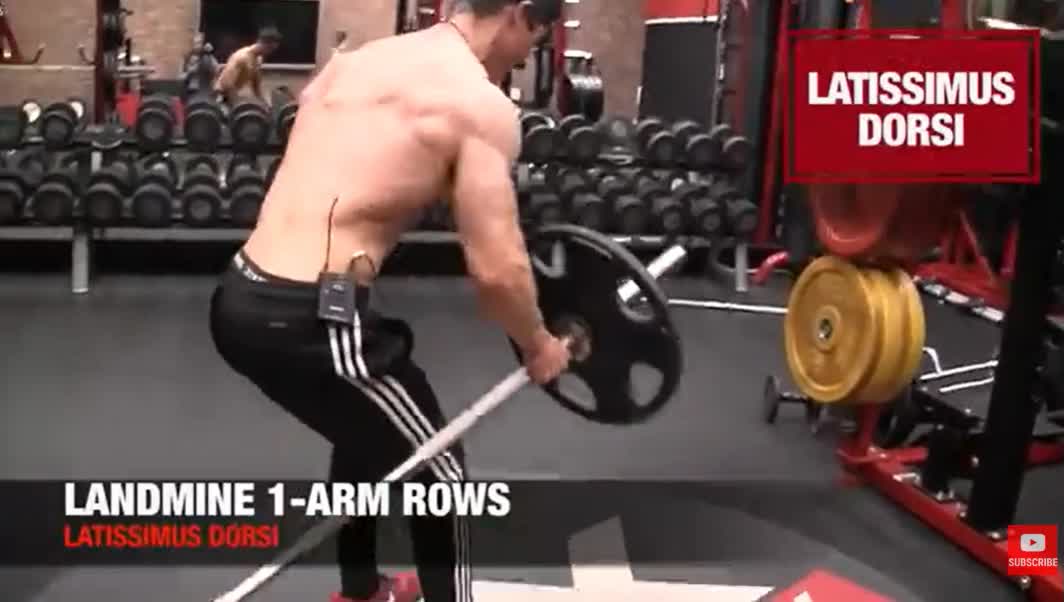
HOW TO DO THE LANDMINE ONE-ARMED ROW:
- Start by setting a barbell into a landmine attachment. If you don’t have one, you can wedge the bar into a corner with a pillow or towel as padding. It’s not ideal but it works when equipment is limited.
- Stand beside the barbell so the plates are in front of your foot on the working side.
- Hinge your hips back and keep your chest angled toward the floor. From here, reach across your body and grab the bar just beneath the plate.
- Before you start rowing, sit your hips back slightly and let your arm drift higher in front of you than it would in a normal Dumbbell Row. This position opens the lat and gives you a deeper stretch at the bottom.
- As you begin the row, pull your elbow back toward your hip while keeping your torso still. Let the plate touch the ground between reps if you’re using larger plates because that dead stop reinforces control and resets your position.
- Maintain the distance between your arm and your pelvis by keeping your hips back. This keeps the lat under tension through the entire range of motion.
- Lower the weight smoothly, allow the lat to lengthen fully, and repeat.
WHAT MAKES IT EFFECTIVE: Because the bar is anchored, you can do unilateral training with more stability than a free-weight row while still challenging the core and obliques to resist rotation. The dead-stop option at the bottom reinforces power and clean mechanics rather than momentum. Altogether, the One-Arm Landmine Row becomes a high-return movement: deep stretch, strong contraction, unilateral strength, and a bar path that naturally fits the way the lat wants to pull.
PROGRAMMING AND PROGRESSION
The T-Bar Row is a compound, multi-joint pull that recruits the lats, rhomboids, mid-traps, erectors, rear delts, and even the rectus abdominis as a stabilizer.
Because of that, it should be placed early in any session. Ideally, right after your first major lift or even as your first major lift depending on the training split.
Where you put it determines how effectively you can load it.
TOTAL-BODY DAY
In a full-body workout, every major lift has to earn its spot.
You’re usually working with limited time and limited recovery between patterns, so you can’t afford to let fatigue from unrelated movements bleed into your heavy rows.
Best placement for the T-Bar Row is second in the lineup, immediately after your primary lower-body compound exercise.
Here’s why:
- Your lower body is taxed, but your back is fresh.
- Your core and brace patterns are already activated from the first lift.
- You can load the T-Bar Row heavily without interference from vertical pulling or accessory work.
Avoid placing it late in a total-body workout because by then, grip, posture, and trunk stability have already taken hits, and you lose the ability to train the row with meaningful intensity.
BACK DAY
If you’re running a traditional back-focused session, the T-bar row becomes a cornerstone movement.
The best placement for it is first or second, depending on the day’s priority.
Use it first when:
- Mid-back density is the main goal.
- You’re avoiding fatiguing hinge patterns early (like Heavy Bent-Over Rows or Deadlifts).
- You want to load the movement aggressively with clean mechanics.
Use it second when:
- The session starts with a vertical pull (Pull-Ups, Lat Pulldowns, Machine High Rows).
- You want your lats pre-activated before hitting the heavier horizontal patterns.
After T-Bar Rows, single arm variations (like Meadows Rows or Unilateral Landmine Pulls) make excellent follow-up work because they fix imbalances and reinforce intentional scapular control.
PULLING DAY (UPPER/LOWER SPLIT)
Pull days emphasize posterior-chain and upper-back movements. Since the T-Bar Row combines a hinge with a horizontal pull, it should anchor the top of the session.
In this case, I’d recommend placing it as the lead-off movement, or immediately after your pull-heavy compound (like an RDL).
Use it first when:
- You want the T-bar row to be your primary strength movement of the day.
- You’re working around low-back fatigue or avoiding heavy barbell hinges early.
- You want to emphasize overall back thickness and power.
Use it second when:
- The session opens with a hip-dominant lift (RDLs, Deadlifts, Hip Hinges).
- You want to hit T-Bar Rows when the posterior chain is warm but not exhausted.
Because a pull day can involve numerous grip-intensive movements, placing the T-Bar Row early prevents fatigue from undermining your ability to control the bar.
FOLLOW-UP WORK
After your main T-Bar Row sets, the rest of your pulling session should complement, not compete with, the angle you just trained.
Good follow-ups include:
- Single-arm variations (Meadows Rows, Dumbbell Rows, Landmine Unilateral Pulls)
- Neutral-grip rows (Machine Rows, Cable Rows, Dumbbell Chest-Supported Rows)
- Lighter technical work (Face Pulls, Resistance Band Pulldowns, Scapular Control Exercises)
These movements allow you to reinforce mechanics without overwhelming the erectors or grip that the T-Bar Row already taxed.
RECOMMENDED SETS & REPS
Because the T-Bar Row is a compound pull that stresses multiple regions of the back at once, the rep range you choose determines the quality of the tension you get from it.
The goal is to give the lats, rhomboids, and mid-back the type of stress that produces a specific training adaptation.
SIZE (HYPERTROPHY)
A range of 3 to 4 sets of 8 to 12 reps is ideal for building back mass. This gives you enough time under tension to feel the lats stretch under the load and fully contract at the top without rushing.
The weight should be challenging, but not so heavy that your hinge collapses or the bar path shortens.
Think of these sets as strict practice, controlled from start to finish, with every rep moving through a complete range of motion.
STRENGTH
If your goal is to develop a stronger, denser back, 4 to 5 sets of 5 to 8 reps works best.
The lower rep range allows you to use more weight, but only if you can keep your hinge angle locked and your shoulder blades anchored.
The bar shouldn’t drift, the torso shouldn’t rise, and the elbows shouldn’t flare as fatigue builds.
Executed properly, this rep scheme is the kind of strength training that transfers directly to Deadlifts, Bent-Over Rows, and any heavy pulling variation you rely on.
HIGH VOLUME FINISHERS
When you’re looking to accumulate fatigue without overloading the spine, 12 to 15 reps with a lighter load is the right approach.
Slowing the tempo forces the back to stay engaged throughout the entire rep, especially during the stretch at the bottom where most lifters lose control.
This extended time under tension builds muscular endurance and reinforces clean mechanics at a point in the workout where your grip and lower back are already fatigued.
It’s also a safe way to continue stressing the back without risking form breakdown or aggravating a wrist injury.
HOW TO PROGRESS
Progressing the T-Bar Row isn’t as simple as stacking more plates. Real progression comes from being able to repeat the same hinge position, scapular motion, and bar path with total consistency.
When you can control all three without your form drifting, that’s when increasing the load becomes productive instead of counterproductive.
Here’s how I’d recommend perfecting and progressing your T-Bar Rows:
Emphasize Progressive Overload: Progressive overload only works when your form can support it. Add weight only when your posture stays solid from start to finish because an empty bar can expose flaws that heavier loads hide. Don’t force plate jumps. Look for small wins like a deeper stretch, smoother reps, or one extra clean rep. Those signals tell you the next increase will build real strength rather than mask poor mechanics.
Use Strategic Pauses: Holding the top position for one or two seconds forces the back to control the squeeze rather than relying on momentum.
Vary the Handle: A V-bar attachment, neutral grip, or wider grip subtly shifts the emphasis to different regions of the back. Rotating these periodically helps build a more complete strength profile without over-relying on a single movement pattern.
Include Controlled Accessories: Resistance Band Rows, rowing machine work, or single-arm variations can reinforce stability and balanced recruitment, especially if you’re using the T-Bar Row as a primary strength movement.
Prioritize Recovery: If you’re short on sleep, underfed, or still carrying fatigue from a previous training day, your hinge, grip, and scapular control will all suffer. Be sure to get at least seven hours of sleep, maintain a consistent and healthy meal plan, and let your body rest when it’s feeling rundown.
The T-Bar Row is only as effective as the technique and intention you bring to it.
When you control your hinge, direct the pull with your back, and choose the right variation for your workout goals, it becomes one of the most reliable ways to build a stronger, thicker posterior chain.
Master the small but important details, progress in a methodical way, and every rep will start paying you back where it counts.
Check out our complete line of ATHLEAN-RX Supplements and find the best training program for you based on your fitness level and goals.
- The T-Bar Row combines a stable hinge position with a powerful horizontal pull, allowing the lats and mid-back to generate force through a long, controlled range of motion.
- Its fixed bar path reduces wasted movement and makes it easier to load the muscles that drive back strength and growth.
- Set your incline bench to about 30 to 45 degrees. This should be high enough for your arms to clear the floor but low enough to keep your chest locked into the pad.
- Position a barbell at the foot of the bench so the bar hangs directly under your shoulders when you lie face down.
- Lie on the bench, press your chest firmly into the pad, brace your core, and let your arms drop straight down with a shoulder-width or slightly wider grip.
- Before you pull, set your shoulder blades down and back because this stabilizes the upper back and prevents the biceps from taking over.
- Row the bar toward your lower ribs with your elbows tucked and your torso fixed to the bench. Make sure you aren’t rocking or lifting your chest. Just focus on a strict horizontal pull.
- Hold the top position for a moment to reinforce the contraction, then lower the bar smoothly until your arms are fully extended.
- Breathe out as you pull, breathe in as you lower, and keep every rep controlled from start to finish.
T-BAR ROWS FAQ
T-Bar Rows are one of the most efficient ways to build both width and thickness across the entire back.
They challenge the lats, rhomboids, mid-traps, and rear delts in a way that blends stability with heavy loading, giving you the benefits of a Barbell Row without as much lower-back strain.
Because the bar path is fixed and predictable, you can focus more on driving the elbows back, controlling the shoulder blades, and generating a full stretch and squeeze on every rep.
As a result, T-Bar Rows not only build muscle, but they also reinforce the pulling mechanics that carry over to every other major back exercise.
Set an incline bench to roughly a 30 to 45-degree angle and position a barbell underneath the bench so it lines up with your shoulders when you lie face down.
Once you’re on the bench, drive your chest firmly into the pad, brace your core, and let your arms hang straight down with a comfortable, stable grip on the bar.
Before you pull, set your shoulder blades down and back as this locks the upper back into position and prevents your arms from taking over.
From there, row the bar toward your lower ribs while keeping your torso glued to the bench. No lifting your chest, no rocking your body, and no trying to help the rep with momentum.
Hold the top just long enough to feel the back fully engage, then lower the bar smoothly until your arms are extended and the lats are stretched.
REFERENCES

Jeff Cavaliere M.S.P.T, CSCS
Jeff Cavaliere is a Physical Therapist, Strength Coach and creator of the ATHLEAN-X Training Programs and ATHLEAN-Rx Supplements. He has a Masters in Physical Therapy (MSPT) and has worked as Head Physical Therapist for the New York Mets, as well as training many elite professional athletes in Major League Baseball, NFL, MMA and professional wrestling. His programs produce “next level” achievements in muscle size, strength and performance for professional athletes and anyone looking to build a muscular athletic physique.