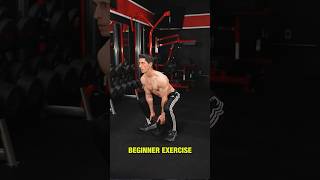
WHY do MOBILITY EXERCISES?
No matter how heavy I squatted or how deep I lunged, my quads wouldn’t grow. They’d give up early and call in help from the adductors, hips, or lower back.
It took me a long time to realize that it wasn’t just a strength issue. It was poor mobility.
Limited hip mobility, weak ankle dorsiflexion, and tight muscles were throwing off my form and cutting my range of motion short.
Everything changed when I learned how the quads and adductors work together and where they go wrong.
When one joint loses mobility, like the hip or ankle, the rest of the body compensates. That’s when you start seeing joint pain, shoulder or knee strain, and movement that just looks off.
As a physical therapist, I see this constantly. The fix isn’t more static stretching. It’s smarter mobility training.
Dynamic stretches and controlled mobility exercises restore stability, improve joint health, and help you move through the full range with power and control.
Mobility isn’t about flexibility. It’s about function. When your joints move well, your body performs better.
Today, I’m breaking down why mobility exercises are essential for performance and injury prevention, how they differ from flexibility work, and the best mobility workouts for beginners to move better, lift stronger, and stay pain-free.
WHY ARE MOBILITY EXERCISES IMPORTANT?
Most people don’t realize it, but your strength is only as good as your ability to move.
You can lift heavy, grind through workouts, and still fall apart the moment your joints hit their limits.
That’s where mobility comes in.
Mobility exercises are what keep your body strong, your joints healthy, and your form solid through every rep.
Mobility isn’t about doing random stretches or chasing flexibility. It’s about owning your movement and building control through your entire range of motion, so the right muscles do their job at the right times.
When you train mobility, you’re reducing the risk of injury, improving joint stability, and setting your entire body up for long-term strength.
If your hips, shoulders, or ankles can’t move the way they’re supposed to, your performance will always have a ceiling.
Here’s why mobility training shouldn’t be optional in your training routine:
KEEPS YOUR JOINTS HEALTHY AND STRONG
Mobility exercises train your joints through their full range of motion, improving joint mobility, control, and stability.
When your hips, shoulders, and ankles can move freely, your body performs every lift with better balance and alignment.
Proper form and body awareness mean less strain on the knee, hip joint, and shoulder joint, and a much lower risk of injury during heavy lifts or everyday activities.
Even simple mobility training exercises, like Controlled Shoulder Circles or 90-90 Shape Hip Rotations, help you build strength in your active range instead of just stretching passively.
This kind of dynamic stretching is what keeps the entire body moving smoothly and safely in and out of the gym.
UNLOCKS STRENGTH AND PERFORMANCE
If your body can’t move, it can’t grow.
Limited ankle mobility or poor thoracic spine mobility can ruin your squat position, shorten your squat depth, and limit how much force your major muscles like your hip extensors, hip abductors, and quads can produce.
That’s why trainers and physical therapists focus so much on mobility before adding load.
When you keep your hips stable, feet flat (or foot flat, if you’re doing a single-leg exercise), and neutral spine aligned, you generate more power with every rep.
A body that moves through its entire range with control recruits more muscle fibers, improves bone density, and helps maintain long-term joint health.
PREVENTS INJURIES BEFORE THEY HAPPEN
Most lifters wait until they feel joint pain to take mobility seriously. But poor mobility is one of the main causes of shoulder, knee, and ankle injuries.
For example, when the shoulder blade can’t rotate properly or the rib cage can’t stay in position during an overhead movement, other joints pick up the slack.
Over periods of time, that compensation creates inflammation and breakdown. But a strong mobility routine addresses these weak links before they turn into problems.
Simple drills like Band Overhead Reaches, Plank Position Holds, or Half-Kneeling Shoulder Rotations improve coordination between the upper body and lower body, so your joints share the workload evenly and efficiently.
MAKES YOU MORE FUNCTIONAL IN EVERYDAY LIFE
Mobility is about moving better through life. Whether you’re climbing stairs, carrying groceries, or playing sports, good mobility training keeps your body movement smooth and pain-free.
It improves your ability to handle muscle-strengthening activities, aerobic activities, and all forms of physical activity goals without discomfort.
Mobility gives you the freedom to move without limits. You can bend, twist, squat, and reach with confidence.
Combine that with a consistent fitness routine, some dynamic stretches, and plenty of mobility work, and your body stays in tip-top shape for years to come.
MOBILITY EXERCISES VS. FLEXIBILITY EXERCISES
A lot of people think mobility and flexibility mean the same thing. They don’t.
You can stretch all day and still move like your joints are locked in concrete.
The truth is that flexibility is only one piece of the puzzle. Without mobility, that flexibility never transfers to real movement, strength, or performance.
To move like an athlete (and not just look like one) you need both. But one matters more.
FLEXIBILITY: PASSIVE RANGE WITHOUT CONTROL
Flexibility is your passive range of motion or how far a muscle or tissue can stretch when it’s relaxed.
Think of it as the slack in the rope.
You can gain flexibility with static stretches, classic stretches, or long holds that lengthen the tissue for an extended period.
These can feel like a nice stretch especially when done with good form. But here’s the problem: flexibility alone doesn’t teach your body what to do with that range.
You might touch your toes on the floor with knees locked or pull into an overhead position for an extra stretch, but without strength and control, that range disappears the moment you stand up.
Over-stretching without stability can raise the risk of injury in your shoulder joint, hip joint, and knees.
With that said, static flexibility work has its place like after a workout or a moderate-intensity aerobic activity. But by itself, it won’t fix poor movement or keep your entire body in balance.
MOBILITY: ACTIVE RANGE YOU CAN CONTROL
Mobility is your active range of motion or how far you can move while maintaining strength, control, and joint stability.
This is where mobility exercises and mobility training come in.
They combine movement with muscle activation to strengthen your control through the entire range.
Think of mobility as knowing how to use the slack in that rope under tension. You’re not just holding a position. You’re actively teaching your body to own it.
When you perform arm circles at shoulder height, a half-kneeling position with a band overhead, or a quadruped position with palms under shoulders, you’re engaging your nervous system to coordinate every joint.
That’s neuromuscular control, which is the link between your brain and movement.
This kind of dynamic stretching improves thoracic mobility, adductor mobility, ankle flexibility, and overhead stability all at once.
It keeps your hips stable, strengthens the rotator cuff through external and internal rotation, and allows for smoother, stronger movement.
Consistent mobility training builds coordination, balance, and power across the entire body. And that’s the kind of control that pays off in every lift, sport, and everyday activity.
FLEXIBILITY IS PASSIVE, MOBILITY IS POWER
Flexibility is about being able to move into a position while mobility is about being able to move through it.
One makes you limber; the other makes you athletic.
A person with excellent mobility can drop into a deep squat position while controlling every inch of the motion. That’s real performance.
Stop thinking of mobility work as stretching.
It’s body conditioning, muscle activation, and injury prevention all rolled into one. You don’t need to be a gymnast. You just need to move like a human again.
The benefits of mobility training go beyond flexibility including fewer injuries, better movement, and a stronger, more adaptable body.
BEST MOBILITY EXERCISES FOR BEGINNERS
Now you know that mobility is really about control, not just stretching. The next step is learning how to build it.
You don’t need fancy equipment or hours of yoga-style poses to get started.
The best mobility exercises use your body weight (and proper weights when you’re ready), a little space, and a lot of attention to form.
Most people think mobility work is boring or optional until tight hips, cranky shoulders, or a stiff lower back force them to pay attention.
But the truth is, mobility training is strength training.
You’re teaching your body to move with stability through its full range of motion, so every rep in your workout counts.
Here are some of the best mobility exercises for beginners you can start incorporating into your next workout:
CAN OPENERS

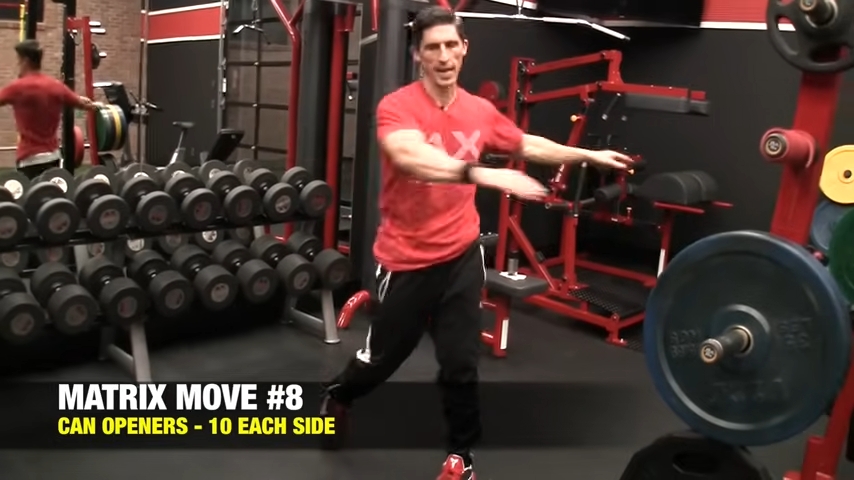
HOW TO DO CAN OPENERS:
- Start standing with your feet shoulder-width apart, knees slightly bent, and arms relaxed at your sides.
- Begin by rotating your hips side to side to loosen up the lower body. Think smooth internal and external rotation through the hips.
- Once you’ve got that rhythm, bring your right arm up as if winding up to throw.
- From here, swing your arm down and across your body, following through the motion like you’re chopping diagonally.
- As your arm comes down, feel a dynamic stretch through the posterior shoulder and rotator cuff.
- Then, bring that same arm back up and open your chest fully, reaching overhead to create length through the front of the shoulder and chest.
- Your left arm moves naturally in sync across and up, mirroring the opposite motion.
- Alternate sides in a controlled rhythm, letting the hips and shoulders work together as one.
WHAT MAKES IT EFFECTIVE: The Can Opener combines upper- and lower-body rotation for total mobility. The hips drive internal and external rotation, while the shoulders and thoracic spine move dynamically through flexion, extension, and rotation. This creates a full-chain effect, improving coordination, rotator cuff activation, and fluidity through the posterior shoulder.
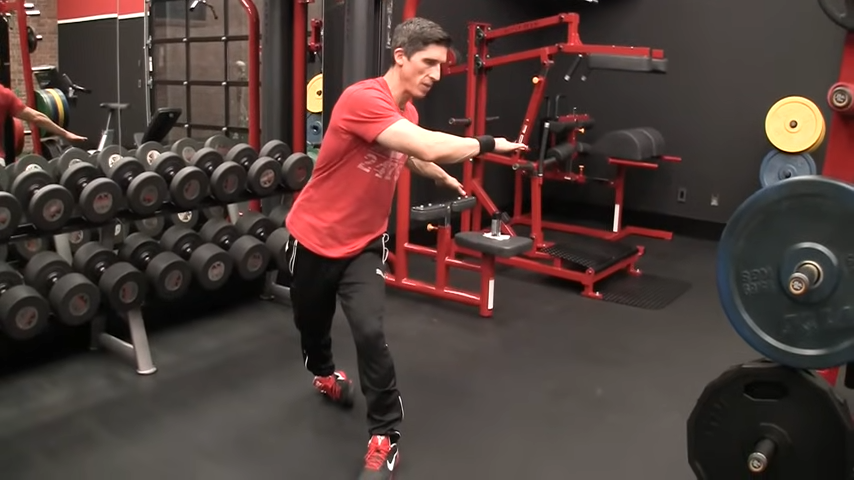
DEAD ARM CIRCLES
HOW TO DO DEAD ARM CIRCLES:
- Hinge at the hips with one arm hanging freely in front of you. Let it go completely loose, like dead weight. Don’t tense your grip or shoulder. The key is relaxation.
- From here, begin making slow, controlled circles with that arm, keeping it as heavy and relaxed as possible.
- Let your fingers reach toward the floor on each pass. They should almost graze the ground if you’re at the right height.
- Make 10 big circles forward, then reverse the direction for another 10 circles.
- Your goal is smooth, fluid motion without jerky swings or forced rotation. Keep your torso still and allow the shoulder joint to move naturally through its full path.
- Once you’re finished with the first side, switch arms and repeat.
WHAT MAKES IT EFFECTIVE: Dead Arm Circles use gravity to gently decompress and mobilize the shoulder joint. By letting the arm hang and move freely, you create a mild traction effect that opens space in the joint capsule and relieves tension in the surrounding muscles.
ANKLE BREAKERS
HOW TO DO ANKLE BREAKERS:
- Position a barbell in a landmine attachment or wedge one end into a corner. Stand perpendicular to the bar with a staggered stance, inside foot forward, outside foot back.
- Bend at the hips into a strong hinge and grab the thick end of the barbell with an overhand grip, arm straight.
- Keep your chest angled toward the floor and spine neutral.
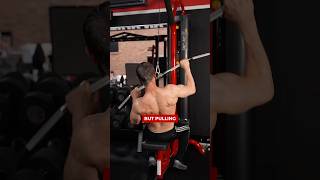
- Drive the elbow back and up toward your hip, keeping it close to your side. Focus on pulling with the back, not curling with the arm.
- Control the eccentric. Don’t let the bar just drop. Reset your shoulder blade at the bottom before the next rep.
WHAT MAKES IT EFFECTIVE: The Ankle Breaker mobility drill targets the small stabilizing muscles around the ankle, especially the peroneals, which are often tight or weak from limited movement or poor footwear. By rolling through controlled inversion and eversion, you improve ankle mobility, strengthen the surrounding support structures, and increase flexibility in the lower leg.
INCH WORMS
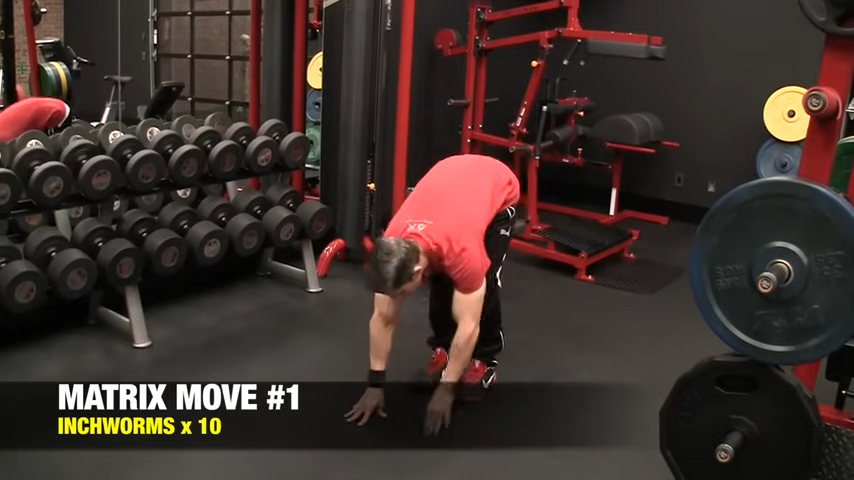
HOW TO DO INCH WORMS:
- Start from a standing position then hinge at the hips and walk your hands forward into a plank position.
- Be sure to keep your core tight and your left shoulder and wrists stacked over your hands.
- Lower your hips slightly for a light stretch through the hamstrings and calves, then walk your feet forward, returning to the start.
- Keep your movements smooth and controlled. This isn’t about speed. Focus on maintaining a straight line from shoulders to heels the entire time and breathing through each step.
WHAT MAKES IT EFFECTIVE: The Inchworm combines aerobic endurance, strength, and mobility in one simple move. It challenges multiple ranges of motion including shoulder flexion, hip extension, and ankle dorsiflexion while reinforcing full-body stability.
ROLLING CRUCIFIX
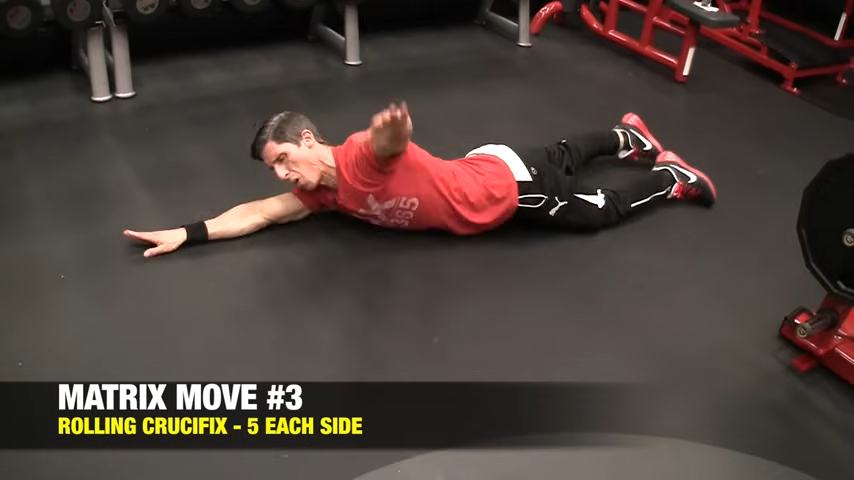
HOW TO DO THE ROLLING CRUCIFIX:
- Start lying face down on the floor with your arms extended overhead in a wide Y position.
- Keep your legs straight and your toes relaxed.
- From here, lift your left arm and begin to twist your upper body toward the right side.
- As you rotate, let your left arm reach up and over toward the ceiling, then continue rolling until it crosses your body to the right side.
- Your right arm should stay long and straight, reaching forward the entire time. You’ll finish the roll looking up toward the ceiling with your chest partially open.
- Pause for a moment, then return slowly to the starting position and repeat to the opposite side, lifting the right arm and rotating left.
- Keep your movements smooth and controlled, letting gravity assist the stretch rather than forcing the motion.
WHAT MAKES IT EFFECTIVE: The Rolling Crucifix opens up the thoracic spine, chest, and shoulders while training your body to move fluidly across multiple planes. By keeping one arm anchored and the other rotating across the body, you create an active stretch through the upper back, pecs, and anterior shoulder, improving rotation and extension at the same time.
TABLE TWISTS
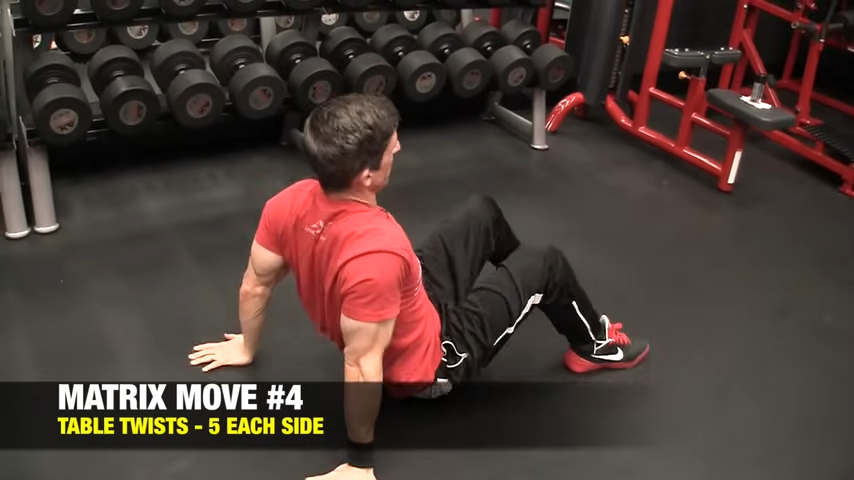
HOW TO DO THE TABLE TWIST:
- Start seated on the floor with your hands placed behind you, fingers pointing slightly outward, and your feet flat in front of you.
- From here, press through your hands and heels to lift your hips, forming a reverse tabletop position with your knees bent, hips high, and chest open.
- Once stable, squeeze your glutes to lift a little higher, then reach one arm across your body toward the opposite side.
- As you reach, push through the supporting shoulder and feel your chest rotate and open. You should feel a deep stretch through your hip flexor on the extended side, along with rotation and extension through the thoracic spine.
- Return to the starting position under control, lower your hips, then switch sides.
WHAT MAKES IT EFFECTIVE: The Tabletop Twist is one of the best mobility drills for improving shoulder stability, hip extension, and thoracic rotation all in one move. It combines glute activation with upper-body mobility, reinforcing strong, controlled movement through the shoulder joint while improving posture and core engagement.
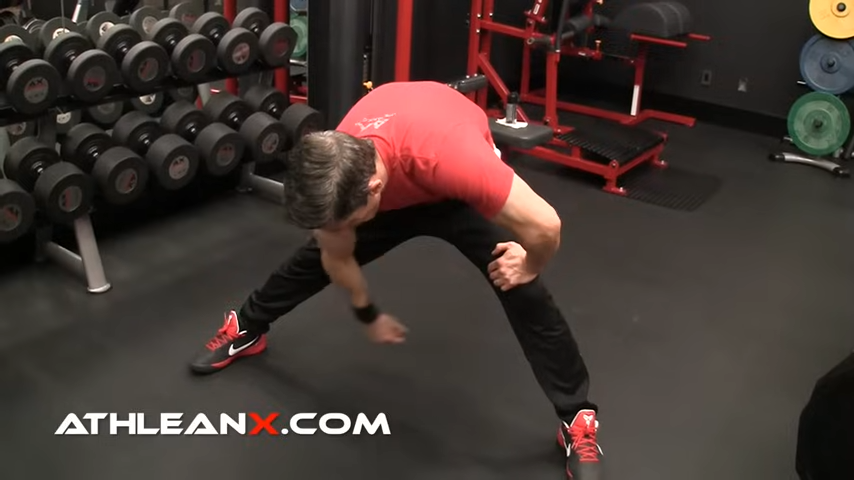
THREE-WAY LUNGES & REACH
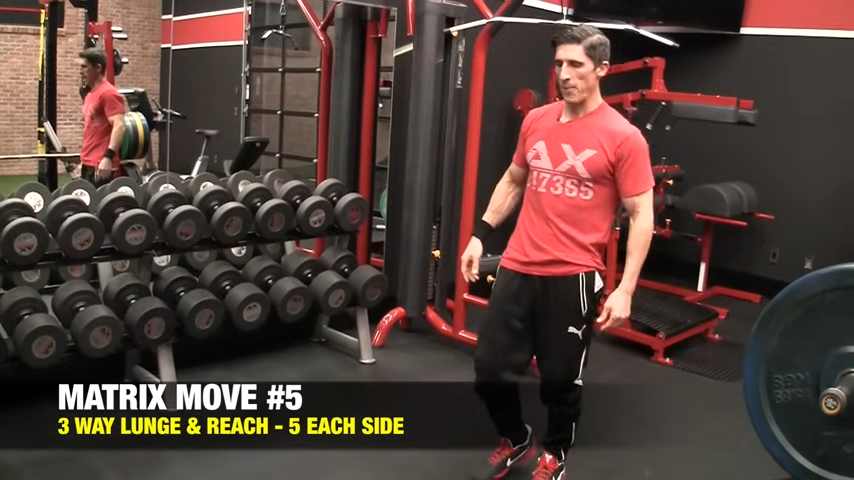
HOW TO DO THE TABLE TWIST:
- Step your right leg forward into a standard forward lunge, dropping your back knee toward the ground.
- As you settle in, reach both arms overhead and slightly back, stretching the hip flexor of the rear leg while keeping the front glute engaged.
- Next, push back to the starting position and step the same leg out at a 45-degree angle.
- Sink into the lunge and lean your torso slightly back toward the planted leg. You’ll feel a groin stretch along with that same glute activation on the front leg.
- Finally, return to the top and step the right leg directly out to the side into a lateral lunge.
- Keep your left leg straight as you shift your hips back, reaching overhead and across to open your rib cage and lengthen the adductors on the straight leg.
- That’s one full three-way sequence. Perform five rounds per leg, moving fluidly through each position without pausing too long at the bottom.
WHAT MAKES IT EFFECTIVE: The Three-Way Lunge & Reach is a full-spectrum mobility and activation drill that hits the hips, groin, and glutes from multiple angles. The forward reach opens the hip flexors, the diagonal step builds rotational control, and the lateral lunge stretches the adductors while training balance and stability.
BEST LOWER BODY MOBILITY EXERCISES
If you want real leg strength, it starts with how you move and not how much weight is on the bar.
You can’t build power or stability if your lower body can’t hit proper depth or stay under control.
That’s where mobility comes in.
These lower-body mobility drills don’t just make you more flexible. They fix how your body moves under load.
LOADING THE QUADS
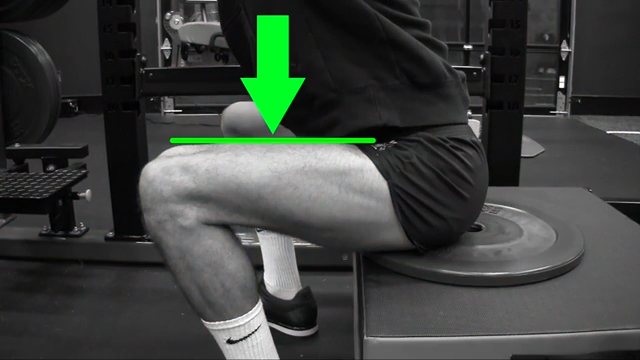
The first key to building better leg mobility and strength is learning how to properly load the quads.
When most people squat, they never challenge the quads the way they’re supposed to. They stop a few inches short of parallel, thinking it’s good enough.
The thing is, until your thighs hit parallel with the floor, your quads aren’t under maximum tension.
When you reach that depth, the downward force of gravity becomes perpendicular to the femur, and that’s the only time the quads are fully engaged.
Cut the movement short and you’re not loading the quads at all. You’re shifting the work to other muscles and robbing yourself of real progress.
This is why you hear coaches talk about hitting proper depth. The parallel squat position isn’t just a form cue. It’s a mechanical necessity.
It’s the point where the quad muscles, including the rectus femoris and vastus group, have to stabilize and extend the knee through the most challenging range of motion.
If you’ve been living on quarter squats, it’s time to fix that.
You don’t need more weight, and you need better mobility to get down there safely and keep your hips stable, feet flat, and spine neutral.
Work on your ankle mobility and hip flexibility so you can reach full squat depth without your heels coming off the ground or your knees collapsing in.
Once you can hit parallel with control, that’s when the quads start to grow and that’s when your lower-body mobility means something in your training.
HOW TO LOAD THE QUADS:
- Start with a body-weight squat from a strong starting position. Aim for feet shoulder-width or feet hip-width apart, foot flat, and toes slightly turned out.
- Keep your spine neutral, chest up, and core tight the entire time.
- Lower slowly until your body until thighs reach parallel with the floor. You should feel tension equally through the right and left thighs as you descend.
WHAT MAKES IT EFFECTIVE: When you hit true parallel, gravity aligns perpendicular to the femur, placing maximum load on the quads, especially the rectus femoris and vastus group. Staying higher shifts tension away, limiting growth and control. Reaching proper depth builds strength, improves athletic form, and develops aerobic endurance, strength, and flexibility together.
TAKE A NARROW STANCE
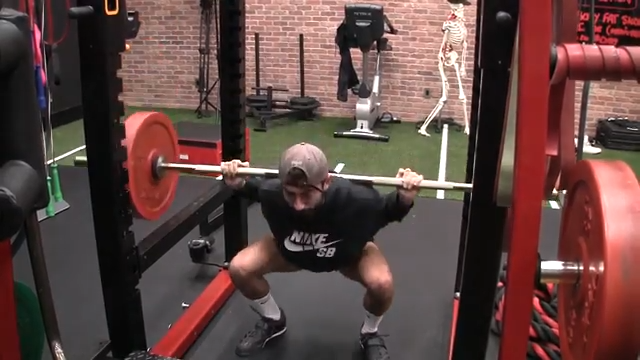
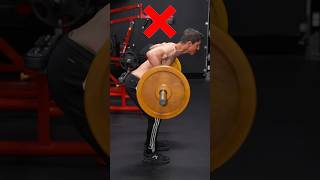
The next key to getting more out of your squat is simple: fix your stance. Most people set up way too wide, thinking it’s safer or more athletic.
But here’s the problem: a wide stance changes the direction of knee travel, forcing the knees to move out at an angle instead of straight ahead.
That pulls the movement more into the frontal plane, shifting tension from the quads to the adductors.
At first, it might feel like an excellent stretch, but it’s not the kind you want.
When the adductors are pulled to their limit, they tighten up to unload that extra stretch, creating a reflex contraction that kills depth and stops the quads from doing their job.
Try it yourself. Take a wide stance and squat down, and you’ll feel that deep tug right under the pelvis. It’s uncomfortable, and it limits your range of motion every time.
The fix? Go narrow.
Take a stance just inside shoulder width with your toes slightly out. This allows your knees to track naturally over your toes without pulling the adductors too far.
You’ll immediately feel the quads, not the groin, driving the movement. At the bottom, your left knee and right knee should stay stable, with your foot flat and hips balanced.
HOW TO TAKE A NARROW STANCE:
- Start with a stance just inside shoulder width: feet flat, toes turned slightly out. Keep your chest up and core tight.
- As you lower, let your knees track naturally over your toes, not out wide.
- Aim to drop until your thighs hit parallel with the floor, keeping your hips level and knees stable the entire time.
- You should feel the quads, not the groin, driving the movement.
WHAT MAKES IT EFFECTIVE: A narrower stance puts the tension right where you want it, which is on the quads. It helps you move through a deeper range, stay in proper form, and build more strength through your entire lower body. Add it to your lower body routine or next lower body day, and you’ll feel the difference immediately. You’ll have more control, more depth, and more muscle doing the work where it counts.
USE A BOX
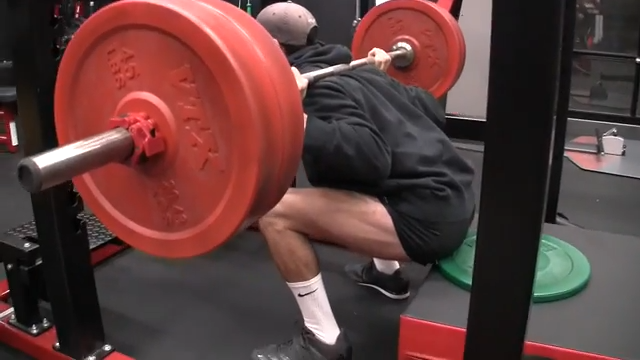
Once you’ve got your stance right, the next step is learning how to hit consistent depth on every rep, every time.
The best way to do that? Use a box.
A box gives you a target and instant feedback. Set it just below your parallel point. If it’s too high, stack a small plate or mat on top until it matches your range of motion.
You’ll know you’ve nailed the setup when you can reach the box without dropping your chest or lifting your right or left foot off the floor.
As you squat, keep your feet shoulder-width apart, sole of foot facing flat, and your knees with hands shoulder-width apart.
Lower under control until you just kiss the box. Don’t sit or collapse onto it. Pause for two or three seconds while staying tight through your core, glutes, and quads.
That pause keeps tension high and eliminates momentum, forcing the quads to drive the lift out of the bottom.
HOW TO USE A BOX:
- Set up a box or bench just below your parallel point. It should be low enough to challenge depth, but not so low that your form breaks.
- Stand with a narrow stance and lower yourself slowly. Keep your chest tall and core tight.
- As you descend, reach your hips back until you lightly touch the box. Don’t sit or bounce.
- Hold that bottom position for a brief two-second pause, keeping tension through your quads the entire time.
- Drive back up under control, pressing evenly through both feet.
WHAT MAKES IT EFFECTIVE: This technique works for all fitness levels. Whether you’re chasing a 30-day mobility challenge or just trying to move through activities without pain, the Box Squat helps fix body parts that have gone immobile, reinforces proper depth, and teaches true tension. Add it to your body for conditioning routine or balanced fitness plan, and you’ll feel the benefit of mobility training where it matters most.
COMMON MOBILITY MISTAKES TO AVOID
Mobility isn’t about spending more time stretching. It’s about moving with purpose.
You can do plenty of mobility training and still stay tight if you’re doing it wrong.
Here are the five biggest mistakes that kill your progress and how to fix them for good.
DOING ONLY PASSIVE STRETCHES
If you just sit in a stretch waiting for something to “loosen up,” you’re not building mobility. You’re building dependency.
True mobility means creating control in motion, not hanging in place.
After any static stretch, add movement. Try Table-Top Position Shoulder Taps or a Tall Kneeling Position Hip Reach to turn a passive hold into active stability.
Your favorite mobility exercises should always train control, not just comfort.
RUSHING THROUGH REPS
Speed is the enemy of control. Flying through Inchworms, Can Openers, or Rolling Crucifix reps might feel productive, but you’re skipping the brain-to-muscle connection that builds range.
Slow it down. Breathe through every inch.
Two deliberate, high-quality reps with full tension beat ten sloppy ones every time.
When you move slowly, you teach the nervous system to own those ranges of motion safely.
IGNORING BREATH MECHANICS
Mobility work is about syncing the breath to the body. When you hold your breath, the nervous system locks up, and your muscles fight against you.
Inhale during the setup, exhale as you deepen the movement.
During drills use your breath to unlock new range.
Breathing restores calm, improves oxygen flow, and reinforces proper tension.
NEGLECTING THE BASE: THE ANKLES
Everything starts from the ground up. If your ankles are tight, your knees and hips pay the price.
Ignoring ankle stability is one of the biggest mistakes in mobility work.
Spend extra attention to target ankle mobility every week. Use Ankle Breakers or wall-supported calf mobilizations to loosen the peroneals and strengthen the stabilizers.
Better ankle movement means better balance, squat depth, and posture.
SKIPPING THE STRENGTH SIDE OF MOBILITY
Flexibility without strength equals instability. If you never build tension in your new range, your body won’t keep it. That’s why most people stretch daily and still move the same.
Combine aerobic endurance, strength, and flexibility by adding tension to your mobility work.
Try loading the quads, taking a narrow stance, or using a box during a lower body workout to strengthen the end range under control.
Build strength where you’re weakest, and mobility becomes permanent.
HOW TO ADD MOBILITY TO YOUR TRAINING PLAN
Mobility isn’t something you do once in a while when you feel tight. It’s a skill, just like strength or power, that needs consistent work.
The more you move with intention, the better you perform and the fewer aches you collect along the way.
Think of mobility as your insurance policy for joint health, athletic form, and long-term progress.
Here’s how to make it a permanent part of your balanced fitness routine.
BEFORE YOU LIFT
Before you touch a barbell, your joints need to be awake and ready to move through their full ranges of motion.
Spend five minutes before every lift running through a short, dynamic series.
Start with Inchworms to open the hamstrings, shoulders, and core while syncing up your upper and lower body.
Follow that with Can Openers to loosen up the hips and rotator cuffs. This gets you rotating instead of moving like a robot.
Then finish with Dead Arm Circles to decompress the shoulders and promote healthy joint mechanics before pressing or pulling.
You don’t need fancy tools or resistance bands here. Just your body weight, control, and focus. A few minutes of smart prep saves you from sloppy reps, wrist pain, and wasted sets later on.
WHILE YOU LIFT
This is where mobility meets strength. Every lower-body session should include at least one movement that reinforces good mechanics while you’re training.
That’s where these three exercises come in:
Loading the Quads: Focus on squatting to true parallel. Until your thighs reach that depth, your quads aren’t under full tension. Slow your tempo, control the bottom, and own that position.
Take a Narrow Stance: Ditch the sumo-style squat unless you’re powerlifting. A slightly narrower stance keeps tension on the quads and off the adductors, helping you reach a deeper, cleaner rep.
Use a Box: Set a box just below parallel and use it as a target. “Kiss” the box, don’t sit. That split-second pause at the bottom removes momentum and forces your quads to drive the movement.
This trio isn’t just mobility work. It’s corrective strength training.
You’re reprogramming your body to move the right way while you build power, size, and stability at the same time.
AFTER YOU LIFT
After training, you’re not done. You’re just switching gears. Heavy lifts create tightness and shortness in the muscles that work hardest.
Now’s the time to bring them back to neutral. Spend extra time here to balance tension and improve recovery.
Start with Rolling Crucifix and Tabletop Twists to open the thoracic spine, chest, and shoulders after any pressing or pulling day.
These drills reset your posture, restore rotation, and let gravity do some of the work.
Follow that with Ankle Breakers to keep your foundation mobile because every lift starts from the ground up.
Finish with a few Three-Way Lunges & Reach reps to reintroduce movement through multiple planes and stretch out the hips, glutes, and adductors.
You’ll finish looser, taller, and ready to come back stronger.
Strong movement isn’t built in the mirror. It’s built in the way your body connects, stabilizes, and adapts.
Mobility is what turns raw strength into real athleticism, the kind that lasts.
Train it with the same focus you give your biggest lifts, and you’ll discover power that feels effortless because it’s earned through control.
Check out our complete line of ATHLEAN-RX Supplements and find the best training program for you based on your fitness level and goals.
- You can’t build real strength on a body that doesn’t move right. Mobility training is what keeps your joints aligned, your muscles firing in sync, and your form locked in.
- Here are 10 of the best mobility exercises that you can start using in your weekly workout routine:
- Loading the Quads: This teaches you how to hit true squat depth and put real tension where it belongs. This move strengthens control through the lower body and fixes the habit of cutting reps short.
- Take a Narrow Stance: This forces the quads to do their job instead of letting the adductors take over. A smaller stance improves depth, balance, and activation from the hips down.
- Use a Box: You can build consistency and awareness in your squat. The box gives you feedback on depth and reinforces control under tension without relying on momentum.
- Inchworms: This is a total-body primer that connects your shoulders, core, and hamstrings. Perfect for improving coordination, posture, and control through your entire chain.
- Can Openers: Unlock your tight hips and shoulders at the same time. The rotational motion activates your rotator cuff and hips, improving power transfer through the torso.
- Dead Arm Circles: Simple but powerful for restoring shoulder motion. The hanging arm compresses the joint, relieving tension and increasing range without strain.
- Rolling Crucifix: This one opens the thoracic spine and chest while training smooth rotation through the upper body. A great fix for anyone who sits too long or struggles with overhead movement.
- Tabletop Twists: This allows you to build shoulder stability and hip extension in one move. You’ll open the chest, activate the glutes, and train the shoulders to stay strong through rotation.
- Ankle Breakers: You can restore the mobility that your squat and lunge depend on. Loosening the peroneals and strengthening the stabilizers gives you a solid base from the ground up.
- Three-Way Lunges & Reach: Challenge your legs and hips through multiple planes of motion. It improves balance, lengthens tight tissues, and teaches you to generate strength from every angle.
MOBILITY EXERCISES FAQ
Not even close and that’s where most people go wrong.
Stretching is passive. You pull a muscle and wait for it to relax. It might feel good, but it doesn’t teach your body how to use that new range.
Mobility, on the other hand, is active control. You’re training strength through motion.
When you perform Inchworms or Can Openers, you’re not just lengthening muscles. You’re engaging them to stabilize while they move.
That’s how you build flexibility you can actually use under load.
The difference? Stretching gives you slack. Mobility teaches you how to handle it.
Every joint plays a role, but a few are non-negotiable: the hips, ankles, shoulders, and thoracic spine.
These are your big movers and if any of them lock up, something else has to pick up the slack, usually your knees or lower back.
That’s why drills like Ankle Breakers and Tabletop Twists matter. They improve the foundation.
Rolling Crucifix restores mid-back rotation, while loading the quads, taking a narrow stance, and using a box teaches your lower body how to move correctly under load.
When these joints move freely, everything above and below them works better. That means more power, less compensation, fewer injuries.
Absolutely, and for most people, these exercises are the missing piece.
Back pain often shows up because your hips, shoulders, or ankles stop doing their jobs. When those joints lose range, your lower back steps in to help and that’s not its role.
Mobility drills like Tabletop Twists and Rolling Crucifix restore rotation through the upper spine, while Ankle Breakers and Three-Way Lunges & Reach open the hips and lower chain so your back doesn’t have to move where it shouldn’t.
Over time, that rebalances your body. You’ll have less tension, better alignment, and a spine that stabilizes instead of compensating.
REFERENCES

Jeff Cavaliere M.S.P.T, CSCS
Jeff Cavaliere is a Physical Therapist, Strength Coach and creator of the ATHLEAN-X Training Programs and ATHLEAN-Rx Supplements. He has a Masters in Physical Therapy (MSPT) and has worked as Head Physical Therapist for the New York Mets, as well as training many elite professional athletes in Major League Baseball, NFL, MMA and professional wrestling. His programs produce “next level” achievements in muscle size, strength and performance for professional athletes and anyone looking to build a muscular athletic physique.