WHy do stomach vacuums?
For years, Stomach Vacuums were treated as an exercise reserved for old-school bodybuilders chasing a smaller waist. (Looking at you, three-time Mr. Olympia, Frank Zane.)
But when you strip away the bodybuilding hype, you’ll find this is one of the most effective ways to train the transverse abdominis.
The transverse abdominis doesn’t get the same spotlight as the visible core muscles like the abs and obliques, but it should because of how important it is for core stability, postural control, and lumbar stabilization.
And if your goal is a tighter midsection, this is the muscle that can help to pull your stomach in, giving you that leaner appearance.
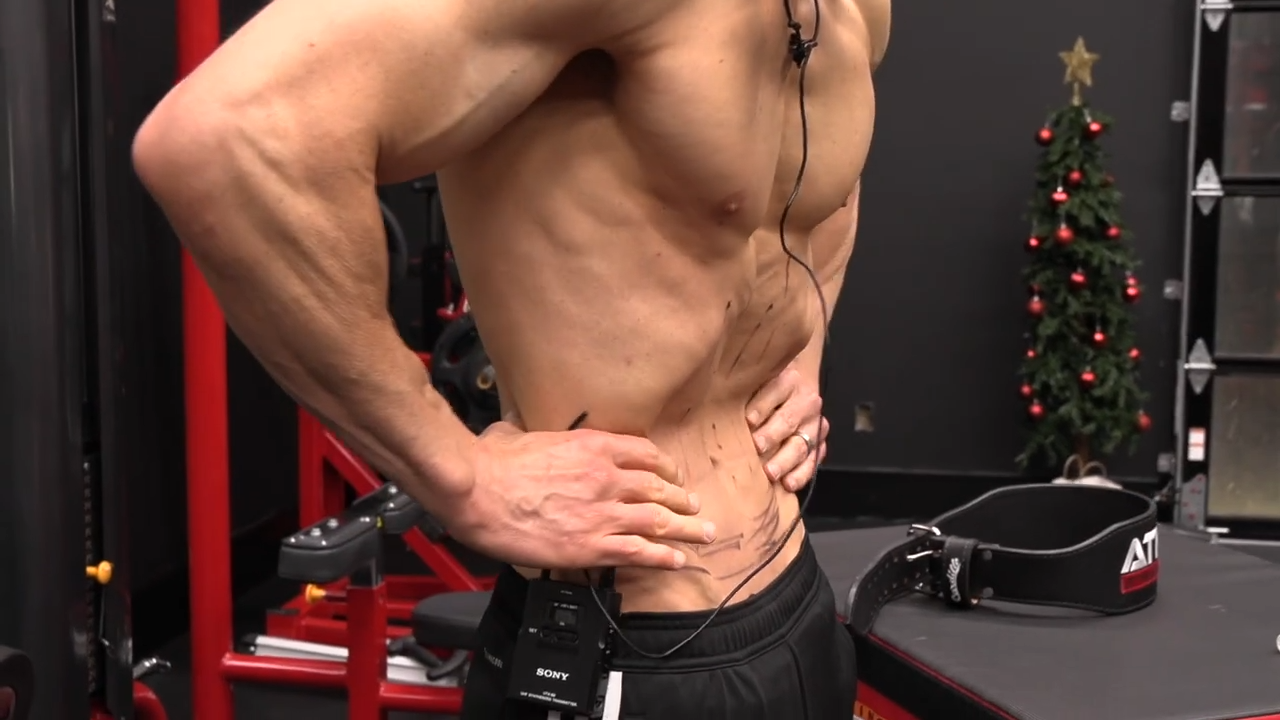
And pulling your stomach in is exactly what you do during the Stomach Vacuum exercise.
Let’s break down the muscles involved, how to do the exercise correctly, the most common mistakes, and how to program Stomach Vacuums into your training.

STOMACH VACUUMS: MUSCLES WORKED
Unlike traditional abdominal exercises that focus on flexing and twisting, the Stomach Vacuum is about muscle activation, control, and pressure management.
This abdominal vacuum exercise targets the deep core musculature responsible for spine stabilization, postural control, and protection of the lower back.
Understanding which muscles are involved will improve your mind-to-muscle connection, allowing you to perform the exercise with control, rather than going through the motions.
TRANSVERSUS ABDOMINIS (TVA)
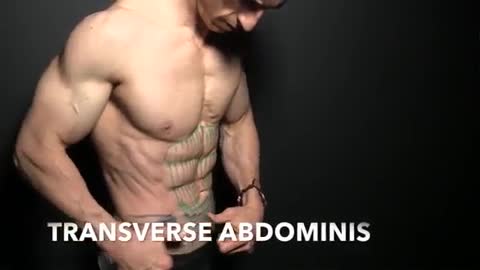
The transversus abdominis is the main muscle trained during the stomach vacuum exercise, and it’s the one most people completely overlook.
Sitting beneath the rectus abdominis (front of your core) and the internal and external obliques (sides of your core), the transverse abdominal muscle wraps horizontally around your torso. It functions more like a corset than a traditional muscle that produces movement.
Because of the direction of these muscle fibers, the TVA doesn’t flex or twist the spine. Instead, it provides tension and support.
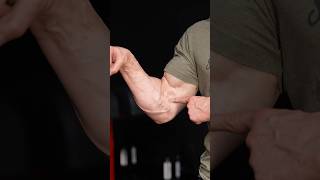
When you perform a Stomach Vacuum correctly, you’re activating the TVA through abdominal hollowing and the abdominal drawing-in maneuver, pulling the abdominal wall inward toward the spine.
This isometric strength contraction increases intra-abdominal pressure, and this immediately improves lumbar stabilization and unloads the lower back.
Functionally, this is one of the most important muscles for spine stabilization, postural control, and long-term core strength.
It helps reduce unnecessary stress on the lumbar spine during lifting, walking, and even standing, which is why TVA activation is heavily emphasized in physical therapy and rehab programs for lower back pain.
INTERNAL OBLIQUES
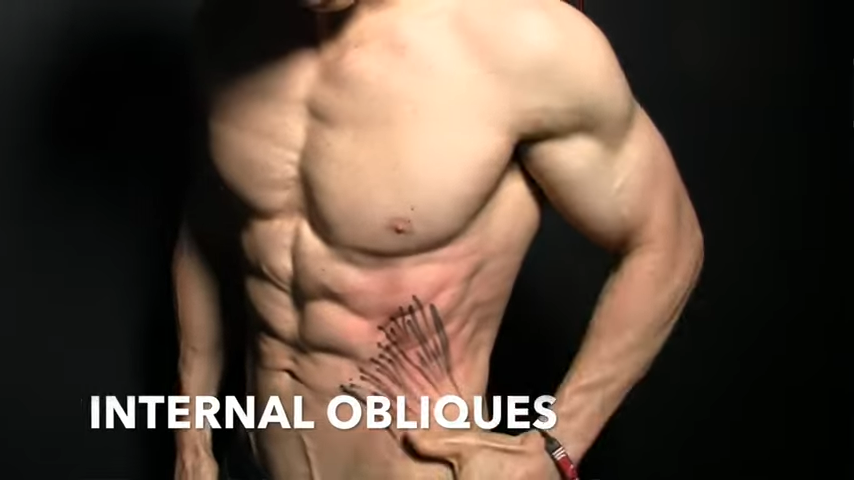
The internal obliques sit just above the transversus abdominis and beneath the external obliques along the sides of the abdomen.
Although these muscles are commonly associated with rotation and side-bending, their role during Stomach Vacuums is entirely different.
The internal obliques are working isometrically, not rotationally, during the Stomach Vacuum.
They contribute to overall core stability training, but they are not the primary driver of the exercise. Their role is supportive by reinforcing tension and alignment so the TVA can function optimally.
During the vacuum exercise, the internal obliques assist by maintaining abdominal tension and helping control the position of the rib cage and pelvis.
This improves neuromuscular control and allows you to sustain the abdominal contraction without compensating through movement.
In other words, they help keep everything locked in place while the deep core does its job.
DIAPHRAGM
The diaphragm is the primary muscle of respiration and forms the roof of the abdominal cavity. During the Stomach Vacuum, it works with the TVA to regulate internal pressure.
Proper diaphragmatic breathing allows you to maintain the vacuum while continuing to breathe, and this is essential for sustained muscle activation.
This coordinated breath work supports intra-abdominal pressure without forcing compensations from the neck, chest, or lower back.
When breathing is poorly controlled or when you simply hold your breath, TVA activation drops, and the exercise loses its effectiveness. That’s why controlled breathing and respiratory muscle training are so important to performing the Stomach Vacuum correctly.
PELVIC FLOOR MUSCLES
The pelvic floor muscles form the base of the core system and sit at the bottom of the abdominal cavity.
During Stomach Vacuums, they co-contract with the transversus abdominis to help manage internal pressure.
This coordinated contraction supports both pelvic and spinal stability, reinforcing spine stabilization from the bottom up.
This synergy between the pelvic floor, TVA, and diaphragm is necessary for maintaining abdominal control and protecting the lumbar spine, especially for individuals with a history of lumbar pain.
HOW TO DO STOMACH VACUUMS
It’s easy to look at Stomach Vacuums and think that you aren’t doing much because you’re not moving.
From the outside, it looks like you’re doing nothing, but anyone who does this exercise will tell you that you’re doing a heck of a lot.
This isn’t a traditional abdominal exercise like V-Sit Pulses or Hollow Body Holds. The goal with Stomach Vacuums is controlled activation of the internal muscles that stabilize your spine, which means execution matters more here than intensity.
To get the most out of this exercise, you need the right position, the right breathing strategy, and the ability to maintain tension without movement.
Here’s how to perform the Stomach Vacuum exercise with perfect form. I’m providing you with three versions of the exercise from least to most difficult so you can match the variation to your fitness level.
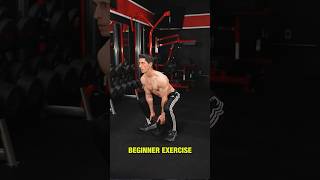
LEANING STOMACH VACUUMS


HOW TO DO THE LEANING STOMACH VACUUMS:
- The leaning or supported Stomach Vacuum is performed by bracing your hands or forearms against a stable surface such as the edge of a bed, a bench, or a countertop.
- Keep your spine long and your neck relaxed. From here, take a deep breath in through the nose, expanding the rib cage.
- Then slowly exhale through the mouth, pushing all of the air out. Keep exhaling until you reach the point where you feel completely empty.
- Once there’s no air left, draw the abdominal wall inward and upward. The movement is subtle but deliberate. You’re not flexing the abs or bracing. You’re creating space by pulling the abdomen in. Hold the contraction briefly, then relax and reset before repeating.
- Because the support reduces balance demands, you’ll feel the abdominal muscles engage much more quickly than in standing variations.
WHAT MAKES IT EFFECTIVE: This slight forward lean changes the mechanics just enough to make the deep abdominal muscles easier to access, which is why this version is ideal for beginners. The support also places the body in a position similar to many hypopressive exercises, where reduced external demand forces internal muscle activation. You either actively contract the deep core, or the exercise doesn’t happen at all. There’s no momentum, no cheating, and no way to accidentally turn it into another ab exercise.
standing stomach vacuums
HOW TO DO THE STANDING STOMACH VACUUMS:
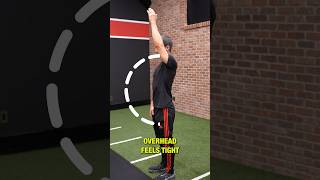
- Stand tall with your feet about hip-width apart. Your posture should be upright, with your ribs stacked over your pelvis and your shoulders relaxed.
- Begin by taking a huge, deep breath in through your nose, expanding your rib cage fully.
- Then slowly exhale through your mouth, pushing every last bit of air out of your lungs. Don’t rush this step. Keep exhaling until you genuinely feel like there is nothing left inside.
- Once your lungs are empty, your body will naturally create reverse pressure inside the torso. At this point, draw your abdominal wall inward and slightly upward toward your spine.
- If you’ve done this correctly, the transversus abdominis will contract hard, and you’ll feel a deep tension across the lower abdomen. It may feel almost like a cramp, and that’s normal. You’ll also notice that speaking is extremely difficult at this point, another sign you’ve fully expelled the air.
- Hold the vacuum for five to ten seconds at first. Relax completely between repetitions and perform three to four controlled reps. As your control improves, you can keep extending the hold 30 seconds. Make your initial goal 30 seconds, slowly working up to it in 3-to-5-second increments.
WHAT MAKES IT EFFECTIVE: When you empty the lungs completely, you eliminate the mechanical advantage of the rib cage and force the deep core to take over. The transversus abdominis must contract to maintain structure, creating tension without movement. In the standing position, that demand increases even further, requiring the core to manage alignment and pressure against gravity, and these are the conditions it faces during loaded movement and everyday tasks.
STOMACH VACUUMS WITH ROTATION
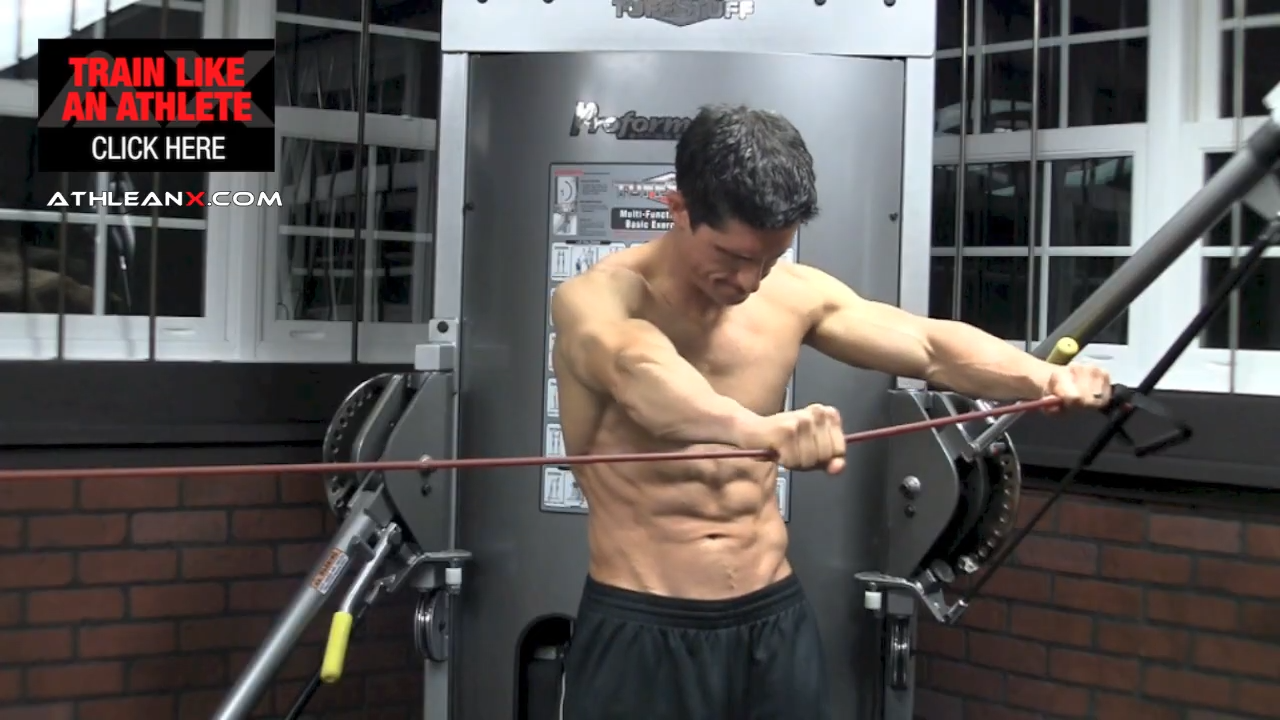
HOW TO DO STOMACH VACUUMS WITH ROTATION:
- This variation builds directly off the standard Standing Stomach Vacuum but adds an external challenge that tests whether you can maintain deep core control under disruption.
- Set up standing tall with a resistance band or cable anchored slightly off to one side at about chest height.
- Hold the handle straight out in front of you with both hands. Your arms stay extended, your ribs are stacked over your pelvis, and your posture remains upright.
- Begin by taking a deep breath in through the nose. Then slowly exhale through the mouth until your lungs feel empty.
- Once you’ve expelled the air, draw the abdominal wall inward and slightly upward to establish the vacuum. The transverse abdominis should fully engage before you initiate any movement.
- From here, without losing the vacuum, begin making small rotations with the hands and arms in front of you. You’re not twisting aggressively or swinging the band. The goal is to introduce controlled disruptions to your stability while keeping the abdomen pulled in.
- Perform controlled repetitions until you feel the vacuum start to slip, then relax, reset, and repeat.
WHAT MAKES IT EFFECTIVE: This variation works because it layers instability on top of an already demanding isometric contraction. Establishing the vacuum forces the deep abdominal muscles to create internal stability. Adding rotation tests whether that stability can be maintained when external forces try to pull you out of position.
STOMACH VACUUM: COMMON MISTAKES
The Stomach Vacuum may look straightforward, but that simplicity is exactly why so many people get it wrong.
Without control, it quickly devolves into a breath-holding exercise, a loss of posture, or a hollow movement that never engages the muscles it’s meant to train.
Below are the most common mistakes and how to correct them.
HOLDING YOUR BREATH
One of the most common mistakes with the Stomach Vacuum is treating it like a breathing challenge instead of a muscle activation exercise.
Simply emptying the lungs and holding your breath does not automatically engage the transversus abdominis.
When the focus shifts to holding air out, tension rises in the rib cage, neck, and upper torso rather than being directed through the deep abdominal wall.
The body becomes rigid, but the core is not actually stable. At that point, the vacuum has stopped training the muscle it’s meant to target.
The Stomach Vacuum begins with a full exhale, but it does not end there. The key is actively drawing the abdominal wall inward and maintaining that contraction while managing the breath.
If you dump all the air at once and clamp down, the nervous system defaults to a stress response, and true TVA engagement quickly fades.
The fix is learning to separate breathing from contraction.
After establishing the vacuum, you should be able to maintain gentle, controlled breaths without losing abdominal tension.
CRUNCHING OR FLEXING THE SPINE
Another common error is turning the Stomach Vacuum into a subtle crunch. This often happens unconsciously as people round forward slightly, pull the shoulders in, or flex at the spine to “help” the contraction.
This completely defeats the purpose of the exercise.
The stomach vacuum is a spine-stabilization drill, not a movement-based abdominal exercise. Any flexion or extension shifts the workload away from the internal stabilizers and onto muscles that are designed to move the spine.
A quick self-check is posture.
If your rib cage drifts forward or your torso shortens as you hold the vacuum, you’re flexing. The spine should remain tall and neutral throughout the entire set.
SUCKING IN THE CHEST INSTEAD OF THE ABDOMEN
This mistake is subtle and extremely common. Instead of drawing the abdominal wall inward, people lift the rib cage and pull air out of the chest.
From the outside, it looks like a vacuum. Internally, the deep abdominal muscles are barely involved.
This compensation usually shows up as rib flare where the chest elevates, and the abdomen appears flatter only because the rib cage has moved upward.
It creates the illusion of abdominal engagement without loading the TVA.
The fix is focusing the contraction lower. The chest should remain relatively quiet while the abdominal wall pulls inward below the rib cage.
A useful cue is to place a hand on the upper chest and another on the lower abdomen. If the top hand moves more than the bottom, the wrong area is working.
OVER-CLENCHING THE GLUTES OR PELVIC FLOOR
In an attempt to stabilize harder, many people over-contract everything at once, especially the glutes, thighs, and the pelvic floor.
The pelvic floor is meant to assist the vacuum, not dominate it. Over-clenching turns controlled core activation into unfocused tension, disrupting timing and reducing the effectiveness of the TVA.
Instead of creating controlled internal pressure, the body relies on brute force. This is similar to overdoing Kegel exercises when the goal is coordination, not maximal tension.
The fix is dialing the contraction back.
The pelvic floor should gently support the vacuum, not dominate it. Think subtle engagement, not squeezing as hard as possible.
When the deep core works efficiently, it doesn’t need maximal effort to stay active.
PROGRESSING TO ADVANCED POSITIONS TOO SOON
Standing and rotational variations are valuable but only once control has been earned.
Jumping straight into advanced exercise positions without first establishing awareness of the deep abdominal muscles turns these variations into compensation drills.
Without that internal control, the body finds easier ways to stay upright usually by shifting tension to the hips, spine, or upper torso.
At that point, the exercise stops training what it’s supposed to train.
The fix is mastering supported or leaning versions first. These reduce balance demands and allow you to feel the contraction clearly.
Once you can establish and maintain a clean vacuum without losing posture or breath control, progression actually makes sense.

CAN STOMACH VACUUMS GIVE YOU SIX-PACK ABS?
When people hear that Stomach Vacuums can help pull the abdomen in, the assumption is often that the exercise somehow spot reduces body fat or immediately reveals hidden six-pack abs.
Sorry to break it to you, guys, but it doesn’t.
Visible abs are still governed by body fat percentage, which means a sustained calorie deficit, fat loss-focused resistance training, and the right lifestyle changes will always be the primary drivers.
Now, with that said, that doesn’t mean the Stomach Vacuum doesn’t play a role in getting a leaner, tighter midsection.
Here’s how Stomach Vacuums can help you with your fat loss goals and what you can do to ensure you get that six pack you want.
WHAT STOMACH VACUUMS REALLY DO
The Stomach Vacuum doesn’t change what’s sitting on top of your abs. It changes what’s happening underneath them.
Specifically, it strengthens the deepest layer of the abdominal wall and the muscle responsible for controlling tension around the midsection.
When this muscle is weak or poorly coordinated, the abdomen tends to relax outward at rest. That’s why some people can be lean, train hard, and still look soft through the stomach when they’re not actively flexing.
By improving deep core control, the Stomach Vacuum teaches the abdominal wall to stay gently engaged instead of passively pushed forward.
As abdominal tension improves, the midsection naturally pulls inward. This doesn’t require flexing or bracing. It’s a resting state change.
Over time, that improved tension can reduce abdominal protrusion and lead to a tighter appearance through the waist, even without additional fat loss.
This is where the distinction matters:
- A flatter stomach comes from better abdominal control.
- Visible abs come from low enough body fat to reveal the rectus abdominis.
The stomach vacuum helps with the first, not the second.
Where this becomes especially important is during a fat-loss phase. If deep-core function is lacking, fat-loss progress can appear muted.
The scale goes down, body fat drops, but the midsection still looks relaxed. When abdominal control improves, that same level of leanness suddenly looks sharper, tighter, and more defined.
There’s also a performance carryover.
A stable core supports better posture, cleaner movement, and more efficient force transfer during resistance training and conditioning.
That stability allows you to train harder and more safely without compensating through the lower back or hips.
In that sense, Stomach Vacuums don’t replace fat-loss efforts, but they support them by improving how your body handles training stress.
FUNDAMENTALS OF EARNING A SIX PACK
If you strip away the marketing, the supplements, and the “secret ab exercise routines,” visible abs still come down to one deciding factor: body fat percentage.
Until body fat is low enough to reveal the rectus abdominis, no amount of core work or muscle soreness will magically expose a six-pack.
This is true whether you’re a recreational lifter or someone competing in aesthetic bodybuilding competitions like the Classic Physique division.
But lowering your body fat percentage doesn’t have to be complicated. Master the basics of sustainable fat loss:
CALORIE DEFICIT
First, you need a calorie deficit, but it has to be the right kind. Fat loss only occurs when you consistently take in less energy than you expend.
That said, driving calories too low backfires.
Extreme restriction slows training performance, disrupts recovery, and increases the likelihood that your body adapts by conserving energy rather than burning fat.
The goal is a deficit that’s aggressive enough to reduce body fat, but sustainable enough to maintain muscle and training quality.
RESISTANCE TRAINING
Second, resistance training must be full-body, not ab-focused. Visible abs aren’t built by isolating the stomach. They’re revealed by lowering body fat while preserving muscle everywhere else.
Compound lifting creates the largest overall demand on the body, helps maintain lean mass during a deficit, and improves how defined the midsection looks once fat comes off.
Ab work refines the core, but it does not replace intelligent total-body training.
HIGH-INTENSITY EXERCISE
Third, resistance training should be complemented with high-intensity work, not replaced by it.
Short, intense conditioning, whether Tabata intervals, circuits, or sprint-style sessions, can increase caloric expenditure and improve metabolic efficiency.
Used strategically, these sessions support fat loss without interfering with strength work or recovery.
CONSISTENCY
Finally, consistency beats everything. None of these elements work in isolation or over short timeframes.
Fat loss is the result of repeatedly making the same correct decisions for training, nutrition, and recovery week after week.
Sporadic effort, program-hopping, or relying on individual “hard” workouts won’t get you there.

HOW TO PROGRAM AND PROGRESS
Stomach Vacuums aren’t meant to wear you out, and they don’t respond well to high volume.
Their value comes from how deliberately they’re used.
Here’s how you can fit them into your exercise routine based on your fitness goal.
SETS, REPS, AND FREQUENCY
Stomach Vacuums don’t follow the same rules as traditional strength or hypertrophy exercises.
Because the goal is controlled activation rather than fatigue, the amount you do and how often you do it needs to match the outcome you’re after.
The guidelines below focus on using just enough volume to reinforce deep core control without interfering with recovery or performance elsewhere in your training.
Muscle Development: If your goal is a tighter midsection and better abdominal control, keep volume modest and consistent. Use 2 to 4 sets of 10 to 30-second holds, resting just long enough to regain breath control. Perform them 3 to 4 times per week.
Fat Loss: During a calorie deficit, the objective is to maintain deep core function while recovery resources are limited. Use a low-volume, high-frequency approach: 1 to 3 sets of 10 to 20 seconds, 3 to 5 times per week.
Strength-Focused: For lifters prioritizing Squats, Deadlifts, and Presses, Abdominal Vacuums serve as a primer, not a workout. Use 1 to 2 sets of 8 to 15 seconds before heavy lifts, 2 to 3 times per week. The goal is neural readiness and spinal support, not abdominal fatigue.
Athletic Performance: Athletes tend to benefit from shorter, intent-driven holds and controlled instability. Use 2 to 3 sets of 8 to 15 seconds, 2 to 4 times per week, occasionally adding small rotational challenges once control is established.
PROGRAM PLACEMENT
With Stomach Vacuums, when you perform them matters as much as how you perform them.
Here’s where you should place this exercise in your program based on the type of workout you are doing.
Total-Body Workouts: In total-body sessions, Stomach Vacuums should be placed both early and later in the workout. First, do them as a primer after a general warm-up but keep them deliberately low in volume and duration. The goal is to activate the deep core, not fatigue it, so it can assist with technically complicated exercises like Barbell Squats. Once the most technically demanding exercises are wrapped up, then you can perform true working sets of Stomach Vacuums.
Split Programs: In upper/lower or push/pull/legs splits, Stomach Vacuums pair best with lower-body or posterior-chain days, where spinal stability demands are highest. As with total-body training, early on in the workout, volume should remain low enough to avoid pre-fatiguing the core. But once the major exercises are done, then you can perform more intense sets of Stomach Vacuums.
Isolation or Ab-Focused Days: If you include Stomach Vacuums on a core-focused or isolation day, they should be done first. Vacuums are not designed to be finishers and pairing them with high-rep or burnout-style ab work defeats their purpose. Treat them as a preparatory drill, then move on to movement-based abdominal exercises that rely on the stability you’ve just established.
What to Avoid: Avoid performing Stomach Vacuums under heavy fatigue, stacking them with high volume, or using them as a substitute for proper bracing during heavy lifts. Vacuums train control, not force production.
PROGRESSION
Progressing Stomach Vacuums is all about maintaining control as the demands change.
Since this exercise targets coordination and deep core engagement, progression should only occur when the contraction remains clean, repeatable, and unaffected by breathing or posture.
Position: Begin with supported or leaning variations, where balance demands are minimal and the deep abdominal wall is easier to access. Once you can consistently establish and hold without posture shifting or breath breaking down, move to standing variations. Rotational or anti-rotation challenges come last and only after control is rock solid.
Duration: Extend holds slowly, adding just three to five seconds at a time. Longer is not automatically better because if abdominal tension fades or the contraction becomes forced, the benefit is lost. For most purposes, thirty seconds is a practical upper limit.
Stability: Gentle rotation or resistance is introduced only once you can maintain the vacuum while breathing calmly and evenly. The purpose of added instability is to test whether control holds under disruption, not to overwhelm the system. If rotation causes the vacuum to disappear or shifts tension to the hips or spine, the progression has come too soon.
When to Regress: Loss of abdominal tension with each breath, visible rib flare, or a sensation that the work has shifted into the hips or lower back are all signals to stop progressing. In those cases, shorten the hold or return to a simpler position.
The Stomach Vacuum teaches you to actively control the muscles that manage internal pressure and positioning in your torso.
When you stop treating it like a breathing trick or a burnout exercise and start using it with clear intent, it improves how your body holds itself during training and at rest.
It supports better movement, cleaner lifting, and a tighter-looking midsection without competing with the rest of your work.
Check out our complete line of ATHLEAN-RX Supplements and find the best training program for you based on your fitness level and goals.
- Stomach Vacuums train you to consciously engage the deep muscles that regulate abdominal tension and internal pressure, something most exercises never address directly.
- That control improves how the torso behaves under load and at rest, which carries over to both performance and appearance.
- To perform the traditional Stomach Vacuum exercise, start in a relaxed, upright, or supported position and first empty your lungs completely with a slow, deliberate exhale.
- Once the air is out, draw the abdomen inward and slightly upward beneath the rib cage, holding that contraction without moving the spine or shoulders.
- Maintain the contraction calmly for a short period, then fully relax before repeating.
- The most common mistakes with the Stomach Vacuum involve turning it into something it isn’t.
- People often rely on breath-holding instead of actively drawing the abdomen in, collapse their posture by rounding or lifting the chest, or over-tense surrounding muscles like the glutes and pelvic floor, which steals work from the deep core.
- Progressing too quickly or performing the exercise while fatigued also leads to compensation, making the movement look correct while delivering little actual benefit.
STOMACH VACUUMS FAQ
They do but only when you understand what they’re working.
Stomach Vacuums train the deep muscle that controls how the core behaves when you’re not flexing or bracing.
That has real carryover to posture, movement efficiency, and how tight or relaxed the midsection looks at rest.
What they don’t do is burn fat, replace proper training, or shortcut your way to abs.
When used for what they’re designed to train, they’re a legit and useful tool.
A proper Stomach Vacuum starts with a complete exhale to remove the influence of the rib cage.
From there, you actively draw the abdominal wall inward and slightly upward without changing your posture or compressing your spine.
Nothing else should move. So, there’s no chest lift, no crunching, and no aggressive bracing. The contraction should feel deep and controlled, not forced.
If you can’t maintain the position calmly, or if the effort shifts into your neck, back, or hips, take a moment, reset, and try again.
This exercise responds best to low volume and high intention. For most people, that means a few short sets rather than long sessions.
This is typically 1 to 4 sets of 10 to 30 seconds, depending on experience.
Beginners may benefit from practicing daily with very short holds to build awareness, while more advanced trainees can use them a few times per week with slightly longer holds.
REFERENCES

Jeff Cavaliere M.S.P.T, CSCS
Jeff Cavaliere is a Physical Therapist, Strength Coach and creator of the ATHLEAN-X Training Programs and ATHLEAN-Rx Supplements. He has a Masters in Physical Therapy (MSPT) and has worked as Head Physical Therapist for the New York Mets, as well as training many elite professional athletes in Major League Baseball, NFL, MMA and professional wrestling. His programs produce “next level” achievements in muscle size, strength and performance for professional athletes and anyone looking to build a muscular athletic physique.